
|
|
|||||
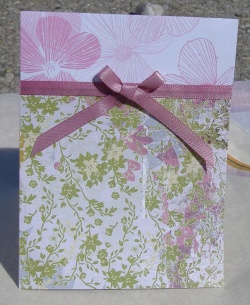
Spring Wedding Invitations
These spring wedding invitations are a perfect modern yet affordable solution to a spring/summer DIY wedding. Springtime always brings these pastel pinks and purples to mind. And of course GREEN! My favorite of all colors. The perfect compliment to all things floral. |
||||||
Materials used to make these pink and green spring wedding invitations
- 8 1/2 by 11" cardstock
- 2 coordinating decorative papers
- satin ribbon
- adhesive/glue
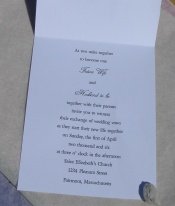
Start By Printing The Wording
Start by setting up the text for the inside of the invitation. You can do this by using either a word processor or use one of our free templates. I recommend using the 5 1/2" by 4 1/4" vertcal card, but like any of teh tutorials on Do-it-yourself-invitations.com, you can make them by any size or dimension that you want.
 If you go with using a word processor you must set up the document to the size of the paper you will be printing on. I used an 8 1/2 by 11" piece of paper cut in half so the dimensions were 4 1/4" width by 11" length. Choose any size paper you like. :-)
The text should be set up the so that it falls below where you would fold the card in half. Make sure and center it as well. Try a test print to see if the text is in the right position for you. It should be centered between the 5 1/2" and 11" portion of the card.
Once you've got it right you can print it onto your chosen card stock. I used an 8 1/2" by 11" 110 lb. white ardstock.
Let's Cut Up Some Paper, Shall We?
Well for one, if you printed your invites using my template, then you will need to cut your paper in half to create two printed invitations per sheet. You can easily cut it yourself if you have a good paper cutter. You can also visit a local copy shop and have the paper cut for you. This is a good option if you have a really large quantity of invitations to make. It's just so much easier!
You'll also want to score and fold these cards before completeing the rest of this task. Scoring is when you make a smooth indent across the card where you intend to fold it. Scoring ensures that the fold will come out clean and straight. Some copy or print shops may have scoring services but it is also something you can do yourself. A lot of sliding blade paper trimmers have a scoring attachment just for this task. I also very much like to use a simple tool called a bone folder. You can find them online and in craft stores for cheap.
Now for the decorative papers! These are a little more tricky than simply cutting in half. You'll need to choose two coordinating papers. The paper you choose to place at the top of the invitation should be cut into rectangles measuring 4 1/4" by 2". The second of the coordinating pattern papers should be cut to 4 1/4" by 3 1/2".
Assemble It!
Start with the larger piece of cut decorative paper (3 1/2" by 4 1/2"). Apply some adhesive to the back. I really like to use a permanent adhesive glue runner. It just makes life easier. There's no mess to clean up or anything. A tape glider may work well also. These glues can become exensive though, so use them sparingly. All it really takes is about a 1" dab at all 4 edges, a small dab at the corners, and one in the middle. Attach the paper to the bottom half of the card aligning with the bottom edges.
Repeat the process with the smaller top pieces of paper. Attach it to the top of the card aligning to the top edges just where the card folds.
To give these spring wedding invitations a nice finished look add the ribbon as I did. You can run some glue runner adhesive across the back of the ribbon. I like to use a light quick dry glue. My absolute favorite is Scotch brand quick dry adhesive. It has a precision tip, so all i have to do is squeeze a small line of glue across the ribbon and lay it onto my project.
Lay the ribbon across teh seam where the two different papers meet. Let it run off the edges. You can go back and snip it off later.
I actually tied the little bows separately and glued them over the ribbon. Simply tie a small bow and adjust it until it is perfect. Snip teh edges of the ribbon at an angle and at the same length. Use some craft glue or a glue gun to attach teh ribbon bows to the front of the invitations.
An Optional Step
You can also choose to create a small pocket to attach to the inner part of the invite. If you decide to do so the text must be shifted higher up on the ppare, or even to appear at the top half of the folded card rather than the bottom.
Make the pocket using either cardstock or even left over pieces of decorative paper. A coordinating colored cardstock will work well too.
To create a pocket you will need to cut a piece of paper that is a 1/2" wider than the width of your invitation. Cut a quarter inch square from each bottom corners. What will be left over are 1/4" flaps on the sides and bottom. Score the flaps where they meet the paper and then fold them inwards. Apply some glue or adhesive and then attach them to the inside of the invite. Instant pocket!
For amor efinished pocket you can use a large paper punch to punch a half circle into the top center of the pocket. For a more detailed, illustrated idea of making an inner pocket take a look at our DIY black and white wedding invitations.
More ideas and tips for making your own pink and green spring wedding invitations...
- Instead of a bow for a decoration for the front of the card try using dried flowers or even stick on small silk flowers. You could even use a small ribbon to tie dried flowers into a small bouquet for the front of the cards.
- Be creative in choosing which kind of decorative paper to make these pink and green wedding invitations with. Switch it up! You can make the same invitation to match any wedding theme or colors!
See Also...
How to print onto blank invitations
How to make invitations using blank cards
Decorative papers for DIY invitations
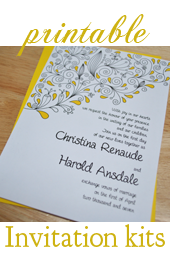
printable pink and green spring wedding invitations
printable purple and green springtime wedding invitations
You may also like these spring wedding invitations ideas...
Do It Yourself Invitations Homepage > Make Your Own Wedding Invitations > Spring Wedding Invitations


The DIYI Ezine
Printable Invitations | Bridal Shower | Blog | Contact | Advertising Policy | Privacy Policy
By Chris Fleckenstein, Copyright © 2006-2013 Do-it-yourself-invitations.com