
|
|
|||||
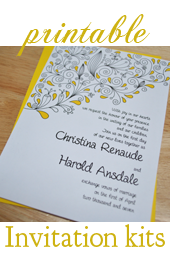
Design Your Own Wedding Invitations
This tutorial will teach you how to design your own wedding invitations card to print yourself at home. You do not need to go out and spend a fortune on wedding invitations. You don't even need expensive fancy software to do it. I want to show you where you can get free download-able software and also how to make your own printable wedding invitations from scratch. |
||||||
You will also need a graphic or picture to work with. A great way to find graphics cheap or even free is to check stock photography and art websites. A good place to look for free graphics and pictures is stock.xchng. The graphics are free to use but you should ask permission or gives the artist a heads up that you'll be using them. Most will be very happy to allow them to go on printable wedding invitations.
Another great place to find graphics is Istockphoto.com. The graphics aren't free but they are only $1 - $2 each. There's no need to ask for permission to use them unless you intend to sell your wedding invitations, or anything else with the graphic for that matter.
Once you've got your software and an appropriate graphic you're ready to go!
How to Design and Make Your Own Printable Wedding Invitations
Open the Pain.net program and start by choosing File > New.A new window will open. Under where it says Print size change the dimensions to 7" wide and 5" in height. This is the best size for selecting envelopes, as well as a much easier size to print with this program. The program is photo editing software, so it's printing selection is to print sheets of photographs. You'll see when we get to the actual printing part.
Now choose File > Open and find the graphic you have chosen to use to design your printable wedding invitations.
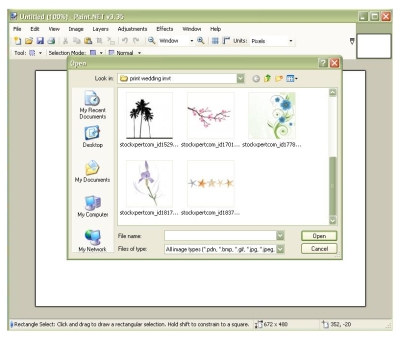
Click open and your file will open as a new document on Pain.net.
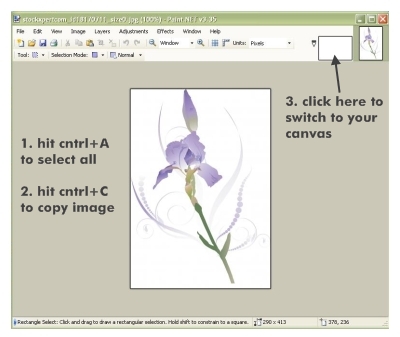
Next you want to copy and paste the image to your 5" by 7" document. Do this by hitting Control + A to select the entire image. Now hit Control + C to copy the selected image.
Switch back to your original 5 by 7 canvas by clicking on the document in the upper right hand corner.
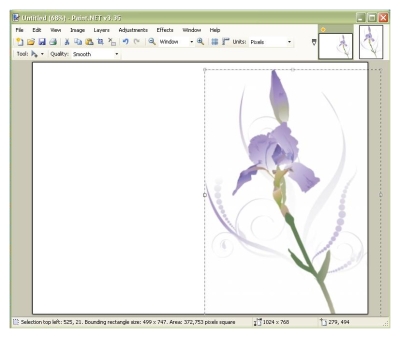
Finally, hit Control + V to paste the image into the document.
While the document is highlighted (as shown in the illustration below), you can move it about the canvas or even enlarge or reduce the size. To enlarge or reduce an image without warping it in any way hold down the shift key while dragging.
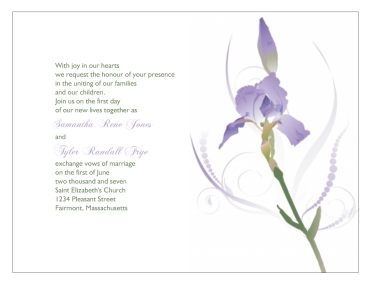
In this circumstance I had to enlarge the graphic just a bit to fill the space from top to bottom of the right hand side of the invitation.
Now to add the wording to these printable wedding invitations.
First things first is the text color. If you want just plain black text then just select the color black from the color palette and simply type in your text.
I prefer a little color in the text and fonts on any wedding invitation. It helps to really pull the entire invite together and make it pop. Select the tool from the toolbox that looks like a little eye dropper. This tool will allow you to grab a sample of any color out of your graphic. Perfect color matching! Select a color from your graphic with the eye dropper tool and then select the alphabet tool from the toolbox.It's the tool that looks like a little "A" with a cursor.
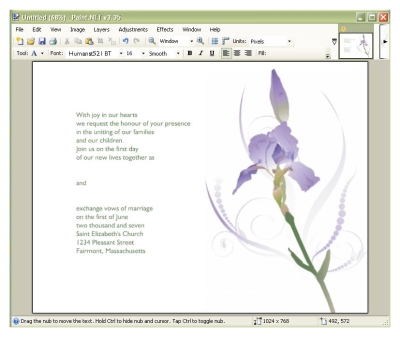
Click the cursor anywhere on the canvas. You will be able to move the text after you have typed it. Type in your wedding invitation wording. You can change the font, size, and alignment of the text after typing as well.
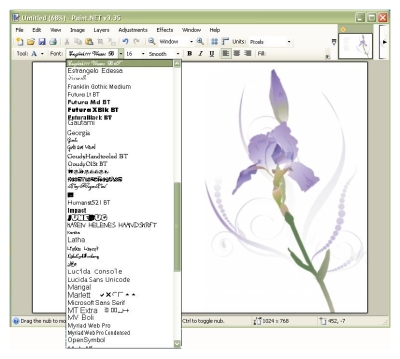
I like to make the fonts for the actual wording different from the fonts I use for the bride and grooms names. To do this you must first type in the wording and then go back and insert the names separately.
When typing your wedding invitation wording make sure and leave three carriage return spaces (hit enter 3 times) between the wording where you will be inserting the names. Once all the details are perfect with the text size, color, and font, move the text to the right spot on the invitation. Choose a different tool in the toolbox to switch off of the alphabet tool.
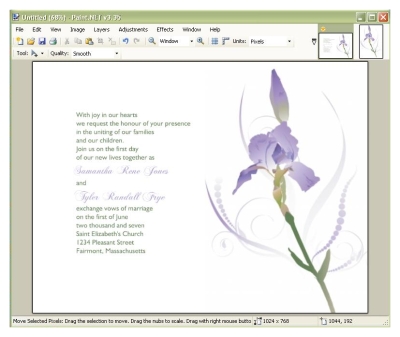
Now to go back and add the bride and groom's names. Start by choosing that little eye dropper tool once again. Choose another color in the wedding invitation graphic. I chose a green for my wedding invitation wording and a nice lavender purple color for the names.
You will have to type the names one at a time. Type the bride or groom's full name. Change the font to a nice scrolling curly font. Change the size of the font to a slightly bigger size as well. Now use the cursor to move the name into place amongst the rest of the invitation wording. Repeat this step for the groom's name as well.
And lastly, sending the wedding invitation designs to your printer. The printer for Paint.net is set up for printing photos on full sheet size paper. Choose a good sturdy weight of paper in a standard 8 1/2 by 11" size.
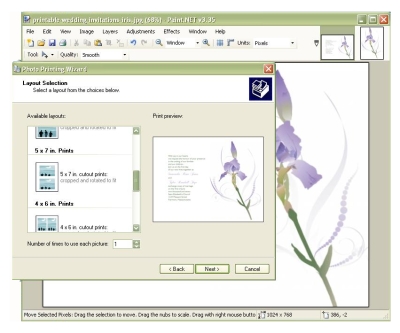
Choose File > Print and a new window will open to the softwares photo printing wizard. Click next to continue to print. At the next window prompt you will need to choose the printing device you are going to print on, and then select printing preferences. Another new window will open. Select the paper description that matches that of what you will print onto. Also choose the highest resolution printing settings available for best results. Select OK and you will be brought back to the printing wizard.
Click next and you will be brought to the Layout selection menu. Scroll through the available layouts until you come to the 5 x 7 cutout prints.
Where it says number of times to use each picture select 2. Click next to go on to print out your invitations.
After you've got your wedding invites on paper they will need to be cut. You can of course, decide to cut them yourself by hand. I would suggest, however, to bring them to a local copy or print shop to have these cut for you. The time it saves, not to mention the aggravation, is priceless. It is likely to cost you less than $10.00 and is done within minutes.
A useful tip to design your own wedding invitations...
* Placement of the text is crucial. Once you are done with the whole invitations you may find that you do not like where you placed the text. You do not have to start over from scratch to fix it. Here's what you do. First select a highlight tool from the tool box. You will want the one shaped like a box with dashed line edges. Make a box around the text. Hit cntrl+C to copy the text. Now select the rectangle tool from the toolbox. It looks like a box with solid edges. In the upper left part of the document next to where it says tool select the option to create a filled shape rectangle. Now simply fill in the area where the text is with a white box to cover it over. Hit cntrl+V to paste the text and move it wherever you see fit.
* If you mess up at any time during the design of your printable wedding invitations simply hit Cntl+Z to undo a mistake.
Have you recently made your own invitations?
Design Your Own Wedding Invitations and visit our Reader Submissions Page and tell us about your handy work!
Do It Yourself Invitations Homepage > Make Your Own Wedding Invitations > Design Wedding Invitations
The DIYI Ezine


Printable Invitations | Bridal Shower | Blog | Contact | Advertising Policy | Privacy Policy
By Chris Fleckenstein, Copyright © 2006-2013 Do-it-yourself-invitations.com