
|
|
|||||
|
DIY Gerbera Daisy Wedding Invitations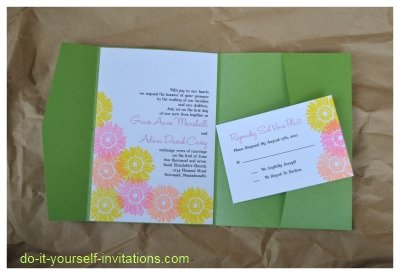
I made these gerbera daisy wedding invitations using a simple daisy rubber stamp image and some well coordinated, colorful rubber stamping ink. I paired the stamped invites with my own DIY pocketfold invite I created using green cardstock. The end result? A gorgeous and affordable Spring or summertime wedding invitation, that was relatively easy to make!
(OPTIONAL)
I chose to cut the paper down to a 5" by 7" size. This is a popular choice for wedding invitations. It's a good size in finding matching envelopes, and for mailing purposes. After cutting the paper down to size I then got out my daisy clear stamp and acrylic block for mounting the stamp onto. If you're new to clear stamps, here's the low down. Clear stamps are a lot like wood mounted rubber stamps, accept you can see through them and they are un-mounted. You can mount them yourself onto acrylic clear blocks which allows you to arrange them however you may like. You can take them off of the block when you are done, and use them over and over again. Another added benefit is the fact that they are clear, so you can actually see where you are stamping the image. Makes for far less stamping "oopsies". :-)

The stamp I chose came form a set by Inkadinkado, called "Garden Delight (#97623). This set is great for any garden theme wedding and has several stamps that could be used along with the daisy image to create a whole matching branded garden wedding stationery set. I used a multicolored petal point stamp set for my choice of inks. It was a Colorbox set ("Enchantment") which made things easy as far as picking inks that were perfectly coordinated.


More tips and ideas to make your own gerbera daisy wedding invitations... * One of the best things about using gerbera daisies incorporated into your wedding theme, is that they come in so many colors! You can pretty much get away with using this theme with ANY wedding color palette! Play with colors by switching up the inks that you use, or the color of the text and wording. Use a different colored backing paper, or pocket invitation. * Want to make it the most affordable as can be? This could be the ultimate in cheap yet fabulouse wedding invitations. Use the invite "as-is", stamped white cardstock. Hold your insert pieces together with some ribbon (you can get thin colored ribbon for around a $1 at craft stores) or even use raffia. You can add a little extra class by tying on a small wedding monogram by using my printable DIY wedding favor tags template. * Give your invite a bit of richness and texture by using some embossing ink or powder. With a heat embossing tool you can give the flower stamps a raised glossy texture.
Other related pages
|
The DIYI Ezine
Stay up to date with the newest tutorials, free printables and giveaways!
|
|||||
|
|
||||||
|
| Homepage | Shop | Wedding Invitations | Birthday Invitations | Baby Shower Invitations | Printable Invitations | Bridal Shower | Blog | Contact | Advertising Policy | Privacy Policy
By Chris Fleckenstein, Copyright © 2006-2013 Do-it-yourself-invitations.com |
||||||
 You can use Microsoft Word or a something similar to set up the document to print this way. I have also included some
  I also made a response card to match the invitations using the same exact process. You could easily use these gerbera daisy wedding invitations "as is" on plain white cardstock, and just pop them in an envelope, but I like to take it a step further. There's several ways you can dress these up. You could tie them together with a ribbon or paper belly-band. You could back them with


