
|
|
|||||
|
Make Your Own Daisy Wedding Invitations:
|
||||||
 Daisy wedding invitations themes are perfect for a breezy outdoor Spring or Summer wedding. Daisies are such a classic flower and will work well for both a casual outdoor, or a classy yet rustic formal wedding. Not to mention that these flowers are easy to grow yourself and also grow wild making for a very affordable wedding flower for bouquets and center pieces!
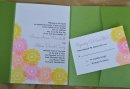
DIY Paper Punch Flowers Invitations
These invites are relatively simple and easy to make. I created them with some simple colored cardstock, a paper punch, and my die cutting machine. Don't have a die cutting machine? No prob! You can make a slightly scaled down version sans the swanky die cut top layer. Just swap out the top layer of white cardstock for a plain square cut piece of card stock. The finished product will still look completely fab!  Materials and supplies list:
- white and colored cardstock
- small circular paper punch
- daisy shaped paper punch
- ribbon
- glue
- die cutting machine (optional)
1. I started by cutting the blue colored cardstock into 5 by 7 inch rectangles to create the backing for the invitations.
The paper I used was a textured bright blue cardstock from Bazzil Basics. You can purchase these papers online or even in your local craft store by the sheet.
2. Next I printed my wording out onto some bright white paper using the nifty template I created just for this project!
To use the template simple download it to your computer, open the PDF file, choose the typing tool and place the cursor in the middle of one of the boxes on the page!
 Start typing! After you have all of the invitation wording typed out onto the page you can then go back and change the fonts, fonts sizes and even colors. To bring up the typing tool palette press Control and E while your chosen text is highlighted.
Make sure and print at your printer's highest settings for super crisp looking text and wording.
3. Here's where it get's a little bit tricky! Next I lined up my paper to the top of my Silhouette Die cutter's mat and sent them through the machine to cut the shapes from the paper.
If you have a die cutting machine:
I have provided a couple of files to help you out in cutting the shapes from the paper.
- A nifty GIF file to upload to Sure Cuts A Lot, etc...
- A Silhouette Studio file all set up and ready to go.
If you do not have a die cutting machine:
The text typing invitation template has a cutting guideline you could use if you have super steady scissor cutting skills, and a small quantity of invitations to make. Yeah, sounds like a pain but I've done it all completely by hand before and it comes out a lot nicer than you'd think!
- For square cut top layer of paper use my free wedding invitation template available here.
 4. To make things simple I applied a very small dot of semi permanent glue runner adhesive to the back of the top layer of the daisy wedding invitations. I then centered the two layers together to get them ready for hole punching.
I punched a small hole at the top center of the white card stock paper, making sure to punch straight through both papers.
5. I inserted a brad into the middle of a small length of ribbon (cut about 7-10 inches each), and thread the brad through the punched hole on the invites. I opened the back tongs of the brad at the back of the invitations, therefore holding the ribbon on and holding the layers of paper together.
I tied the ribbon into a small, pretty bow and snipped the ends of the ribbon to make them even.
 6. Next I got out my daisy paper punch and used it to punch out a bunch of daisy shapes from some light yellow paper. You could use any color you wish to create daisies of all different colors, depending on your preference.
To create pretty three dimensional flowers place a small dot of glue at the middle of the paper punches and layer them together so that the petals alternate. PLace another dot of glue on the top and add a small circular paper piece or a sparkly rhinestone.
 7. Apply some glue to the back of the daisies and apply them to the front of the invitation. You can place them wherever you may like. Try the top center below the bow, or the bottom corner. You can even try placing them on the colored cardstock backing. This would work especially well if you chose to use white daisies instead of yellow or colored daisies.
The end result is gorgeous handmade daisy wedding invitations that are perfect for your summertime backyard or garden wedding. Or even to use as a country wedding invitation!
Other Hints and Ideas For These DIY Daisy Wedding Invitations
- Try using tiny rhinestones, glitter, or flocking for the flower's stamen (middle of the flower).
- Why not use a pretty patterned card stock for the backing paper instead of solid colored cardstock?

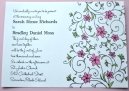
Easy Homemade Daisy Wedding Invitation
Layered Paper and Vellum
The hardest part of creating these invites is to find a daisy themed paper to layer with the vellum. My secret to overcoming this? Design your own!
The paper shown to make this invite is store bought, but you can make a very pretty patterned paper yourself using rubber stamps or even your home computer!
Print a picture of daisy fields onto some thick white card stock, and layer the vellum over it.
Gather a couple of pretty daisy themed rubber stamps, leaves, and flourishes. I like to use a distressing ink in pretty colors to spread over the entire paper with a makeup sponge, and then stamp images on top of it for a very pretty and elegant antique looking paper.
How To Make Homemade Layered Daisy Paper invitations
I made this particular invitation by layering some card stock, decorative paper with a daisy pattern, and some vellum. I added a matching bow to hold all of the papers together. You can make many variations of an invitations like this using a daisy charm affixed to a small brad to hold the papers together, or even some dried flowers or handmade paper with dried daisies.

8 1/2" by 11" card stock
printable vellum
1/8" hole punch
ribbon
To make these invitations start by Printing your wording onto some printable vellum. Some vellums are too slick to hold ink or may damage your printer when you send the paper through it. The vellum should say right on the paper or package if it is meant to be printed onto.
To print onto these you can either print the wording 2 to a page (need help? visit the wedding invitations text templates page and order a printable template.) and then cut the vellum in half. Or you can cut the vellum in half ahead of time and then simply set up your computer document to the appropriate size and print straight onto the cut vellum.
Next trim 3/4" from each edge of the printed vellum pieces. In the end you will have a piece of vellum measuring 4" by 7". Now move on to cut both the card stock and the decorative paper. The card stock should be cut in half (assuming that you are using 8 1/2" by 11" card stock) giving you two pieces sized at 5 1/2" by 8 1/2". The decorative paper should be cut to 5" by 8".
TIP: To cut some major time and hassle from making your own daisy wedding invitations, take all of your papers on over to a local copy or print shop and have them cut the papers for you. Many of these shops have a hydraulic paper cutter which can cut all of your paper at once. It will be done in minutes, leave you with a perfect cut, and is very inexpensive.
Now on to the assembly of these invitations. Simply hold all of your papers together, layered so that the decorative paper is centered onto the card stock, and the vellum is centered onto the decorative daisy paper. Now punch two holes adjacent to each other abound 1/8" - 1/4" apart, right in the center top of the invitation. These holes are to insert a ribbon to hold it all together.
To finish simply cut some lengths of ribbon, insert them into the holes, and then tie the ribbon into a pretty bow.
Do It Yourself Invitations Homepage > Make Your Own Wedding Invitations > Daisy Wedding Invitations
Have you recently made your own invitations?
Want to share them with us?Just visit our Reader Submissions Page and tell us about your handy work!


Printable Invitations | Bridal Shower | Blog | Contact | Advertising Policy | Privacy Policy
By Chris Fleckenstein, Copyright © 2006-2013 Do-it-yourself-invitations.com