
|
|
||||||||
Make Snowflake Wedding Invitations
|
|||||||||
There are several ways to pull together your own handmade snowflake invitation suite. Here are some of my tips to creating an elegant DIY snowflake wedding theme. The best part of DIYing it is that you can use the materials to make several other wedding crafts.
Great Inexpensive DIY Snowflake Invitation Ideas
1. - Rubber Stamps! Rubber stamps are the ultimate way to create wedding invitations on the cheap. There are so many inks out there in so many different colors to choose from. You can even heat emboss your rubber stamp impressions to give a textured raised look to the embellishments. Add a ribbon or pop your invite into a pocketfold and you've got a fabulous homemade wedding invitation.2. - Snowflake Paper! Peruse the scrapbooking aisle of any arts and crafts store around winter time and you are certain to come across several decorative patterned papers with a wintery snowflake theme. Sold by the sheet at full price these papers can cost a pretty penny. My money saving tip? Wait a week or two and keep an eye on the craft store sales flyers. These paper go on sale constantly and at 50% off and more. You can also buy these papers in packs which also go on sale often.
3. - Stickers! OK I know your thinking "cheesy", right? Todays craft stickers are not the ones you may have played with as a kid! There are absolutely beautiful, to die for stickers available at any arts and crafts stores. They range in price from quite affordable to a little over the top, but again, wait for the sale! Use a coupon. You will save a bundle!
1. - Paper Punches! Snowflake shaped paper punches are another inexpensive, creative and unique way to put together your snowflake wedding invitations. Try punching your snowflake sout form some really pretty patterned paper in pale blue colors or shimmery papers. So pretty! For a whimsical snowflake invite you could paint your snowflake punches with glitter glue, or paint with craft glue and sprinkle on the glitter.
1. - Use a Printable Invitation Template. - OK, yes, I had to throw it out there! It is a really inexpensive and easy way to create DIY invitations. Use our templates! I'll show further down on this page how I created some handmade invites for a client using our printable snowflake wedding invitation template. I mounted the invites on pale blue cardstock and then added some stick on pearls and sheer ribbon. The end result was gorgeous!
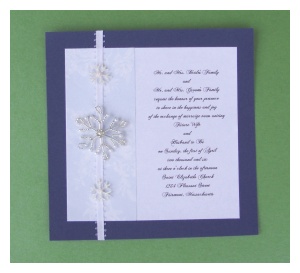
DIY Wedding Invitation - Stick On Snowflakes
I made these snowflake wedding invitations using peel and stick snowflake embellishments (stickers!!). You can replicate this same idea with pretty much any sticker or paper punch.
 Tools and Materials needed to make these snowflake wedding invitations:
12" by 12" card stock
decorative paper
ribbon
white cardstock
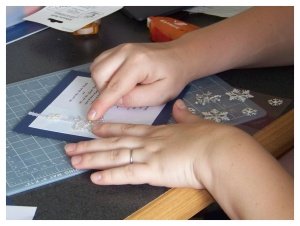
snowflake stickers or embellishments
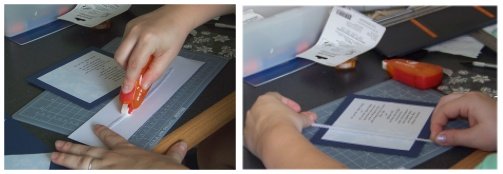
Start by cutting some colored 12 by 12 cardstock in quarters to create 4 6" by 6" squares. Pick some decorative paper to coordinate with the cardstock and wintery snowflake theme. Cut the decorative paper into 5 1/2" by 5 1/2" squares.
Cut some white cardstock into 4" by 6" rectangles and print the wording for your invitations onto it.
Use a permanent adhesive glue runner to apply some glue to the back of the decorative paper and mount it to the cardstock backing, centering the papers as best as you can.
Apply some adhesive to the back of the white cardstock pieces and mount them to the front of the invite, aligning directly to the right edge of the decorative paper.
Choose some coordinating ribbon and apply some glue to the back. Mount the ribbon to the card, vertically, over the decorative paper. Snip the ends off with some scissors or a craft knife.
Wanna Use the same materials I used to make these snowflake wedding invitations?
card stock: 12" by 12" midnight blue
decorative paper: 8 1/2" by 11" paper by Stemma/Masterpiece Studios - "Blue Toile" #1153289
snowflakes: Jolee's Boutique dimensional stickers - snowflakes #SPJ044
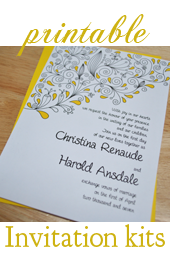
Printable Snowflake Wedding Invitations
We've got some free printable snowflake invitations, as well as our snowflake wedding stationery kit available in our shop.
Free Printable Snowflake Wedding Invitations
This is a free template you can use to personalize and print your own wedding invitations. These are perfect for printing and mounting to colored cardstock. Add some ribbon and you're done!

|

|

|
Invitations Made Using Our Printable Invitations Kits
I created this invitation suite using our printable snowflake wedding invitations kit. These were pretty simple and inexpensive to make, and came out sooo pretty!


Here's how I did it:
It was all pretty simple. I printed out the template kit items onto some heavy white 110 lb. cardstock.
I cut went and had all of the items cut for me at a local copy shop. You can save a few dollars by cutting them by hand, but it is a lot more work. You'll need a good paper cutter.
I used a permanent adhesive glue runner to mount the white cardstock to some pale blue cardstock, for the invites, rsvp's, and favor tags.
To dress up some of the pieces I added stick on pearls to the centers of the snowflakes, and as decorative accents on the Save The Dates. To top it all off I added a sheer ribbon to the invitation which was used to hold the rsvp and reception cards.
Price Breakdown:
For a Grand Total Of: $90.50 for 100 invitations, rsvp, save the dates, favor tags, enclosure cards, and menus.
Do It Yourself Invitations Homepage > Make Your Own Wedding Invitations > Snowflake Wedding Invitations
The DIYI Ezine


Printable Invitations | Bridal Shower | Blog | Contact | Advertising Policy | Privacy Policy
By Chris Fleckenstein, Copyright © 2006-2013 Do-it-yourself-invitations.com