
|
|
|||
|
Frog Baby Shower InvitationTo Match Your Theme Baby Shower
Materials used to make frog baby shower invitation: Start by printing onto the cardstock to create the wording for the inside of the card. To conserve funds and paper I recommend setting up the text in a 2-up invitations format (or two invitations to a page) format. The paper should be facing the wide way with the text centered and printed side by side on the lower half of the paper, to allow room for folding the card. Once you have the cardstock printed onto, and cut in half, it will be time to fold the invitations. This invitation is designed to be folded so that it opens from bottom to top. These are usually quite easy to fold so long as you are using a standard 65 lb. cardstock or lighter. If the paper is a bit on the heavier side you may want to score the paper first. Many sliding paper cutters come with a scoring attachment. If you do not have the means to score the invitation then try running the flat edge of a ruler over the fold to smooth out any wrinkles. A lot of the time this works like a charm. To decorate the frog baby shower invitation you will start by printing out this decorative template to make the "baby shower" decoration for the front of the invitation. Print this onto plain white paper and use a good paper cutter to cut the squares from the paper. I recommend cutting just inside of the lines as to not carry any black lines onto your baby shower invitation. Cutting decorative paper backgrounds for the frog baby shower invitations. The decorative paper I used for the background of the invitation was actually intended for scrapbooking. You can find paper like this in many different color schemes, patterns, and themes. You will have to cut the paper down to a size that will fit perfectly onto the front of the invitation. A good size to cut this paper to is about 4 1/4" by 4 1/4". Making paper punch decorations. This part is easy. Just get out your decorative paper punches and start punching out piles of shapes from colored paper to decorate the frog baby shower invitation. I used a frog shaped punch and a daisy punch. Another great choice would be to use a lily pad paper punch. Punch enough paper shapes to glue to the front of all of your invitations. Assemble the invitations. Start by attaching the decorative paper background. The best way to attach this paper is by using a pemanent adhesive glue runner. Using a glue runner assures you that the invitation will not end up warped after the glue dries. A glue runner will attach the paper using very little glue. When you use craft glue or glue stick you need to use a lot more glue to keep it stuck, and it tends to warp and wrinkle the paper as it dries. More tips and ideas to make a frog baby shower invitation * You know, these do not necessarily have to be frog themed invitations. You could match many different baby shower themes by simply changing the shapes you choose for your paper punches! * For the best affect use a decorative paper with a somewhat simple pattern. If the pattern is too busy or bold, it will overcome the text, and paper punch shapes.
Have you recently made your own invitations?Want to share them with us?Have your handmade invitations featured on our Do It Yourself Invitations! Just visit our Reader Submissions Page and tell us about your handy work!
|

The DIYI Ezine
Stay up to date with the newest tutorials, free printables and giveaways!
|
|||
|
|
||||
|
| Homepage | Shop | Wedding Invitations | Birthday Invitations | Baby Shower Invitations | Printable Invitations | Bridal Shower | Blog | Contact | Advertising Policy | Privacy Policy
By Chris Fleckenstein, Copyright © 2006-2013 Do-it-yourself-invitations.com |
||||
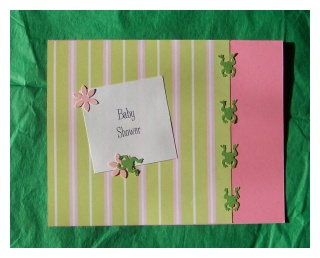 The frog baby shower is a theme that is growing ever more in popularity all the time. It's quite an appropriate theme for a baby boy's shower. This theme can even be used for a little girl's shower as you can see on the invitation I show here. These days there are a whole culture of people who love and collect frogs and frog themed items. That is just where this idea came from. A close friend of mine who simply loves frogs and anything to do with them. Even though she is having a girl, I still went with this idea for her baby shower invitations. I think the pink and green goes quite nicely together.


