|
|
||
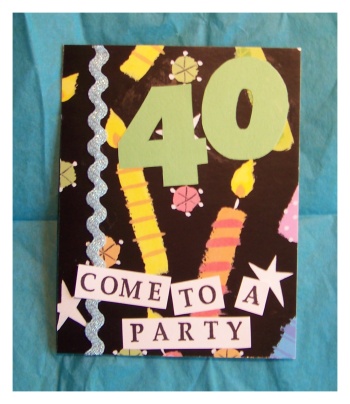
40th Birthday InvitationsThese 40th birthday invitations are constructed using card stock as the base of the card. To create these cards you will cut the card stock in half leaving you with two pieces of paper. You will then fold these pieces in half to create a card. You will make two cards from a single piece of card stock.
 8 1/2" by 11" card stock birthday theme decorative paper rick rack ribbon (optional)rubber stamp lettering
A word about cutting the paper - You can easily cut the paper yourself using a good paper cutter if you want to save money. Another great way to ease the work load is to bring the paper to a local print or copy shop. They will not only copy the invitation wording onto the paper for you, but they will also cut the paper for you. These kind of shops usually have a hydraulic paper cutter designed for cutting many sheets at once. It is cheap, and super easy. After you have printed onto all of your card stock, and have it cut in half as well, the next task is to fold all of the card stock in half to create the base of the invitation. Now on to the decorating! Start by adding some decorative paper to the front of the invitations. Cut your chosen paper into rectangles to fit onto the front of the card. (Pssst. Can also cut these by hand or bring em' to the copy shop along with everything else.). This paper should be cut to measure 4 1/4" by 5 1/2". Cut the rick rack into lengths of about 6" each. Use the glue runner to attach these to the front of the 40th birthday invitations as well. Again, you really do not need to cover the entire thing in glue. Just the ends and the middle should be fine. Attach the rick rack to the invitation so that it hangs off the edge a little on each side. After it has stuck go back and trim the edges. To create the "Come to a party" lettering I used rubber stamp letters. If you do not have letter stamps, or just want to make the project a little easier, just print the lettering off of your computer. I just happen to enjoy using stamps. Create the lettering on plain white paper (whatever you have - I used index cards just because they happen to be sitting there). Cut each word out into a bock. Use a glue runner to apply glue to the back of each and arrange the lettering onto the front of the invitations. I like to stick each word a little crooked from each other. Try to overlap the rick rack a little too. Now on to the big 4 0. I actually used a paint program to create the numbers in a font and size that I liked, printed them onto some colored card stock, and then cut them out using the printed numbers as a guideline.
|
The DIYI Ezine
Stay up to date with the newest tutorials, free printables and giveaways!
You Might Like...


|
||
|
|
|||
|
| Homepage | Shop | Wedding Invitations | Birthday Invitations | Baby Shower Invitations | Printable Invitations | Bridal Shower | Blog | Contact | Advertising Policy | Privacy Policy
By Chris Fleckenstein, Copyright © 2006-2013 Do-it-yourself-invitations.com |
|||