
|
|
|||
|
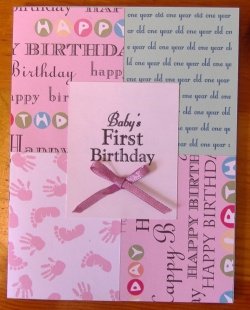
Make Patchwork Baby Birthday InvitationsThese baby birthday invitations were inspired by the most basic of baby items; baby blankets, or baby quilts to be more specific. I loved the idea that I could create a virtual "baby quilt" with paper! All you need to put these cute invitations together is some cardstock, some decorative paper with "baby-ish" patterns, some glue or adhesive, and a little bit of creativity!
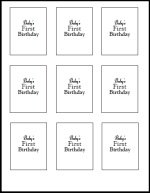
For the text on the inside of Baby's first birthday invitations - Use our free printable interactive invitation template. Use the template for creating a standard 5.5" by 4.25" folded card. The template creates two folded cards out of each standard sheet of 8 1/2" by 11" paper.
For the text on the front of first birthday invitations - The main text is the "Baby's First Birthday" on the front. These words should be printed onto a different paper (can print onto either plain white paper or card stock). The easiest way to do this is to use a desktop publishing program to set up a box that is the same size that you will want to attach to the front of the card. In other words I created this box to be sized at 2 1/8" by 2 3/4", the same size as a quarter of a page.
Step Two: Cutting the paper for these invitations. If you used a 2-up text layout then the first thing you will do is cut the card stock in half to make separate cards. Step Three: Create folded cards. Speaks for itself! Using the paper which you printed your invitation wording, start by cutting the paper in half to create two invitations. After cutting you will want to score and fold each piece to create a folded card. I like to use a bone folder for this sort of project. It works wonders at scoring and folding beautifully, and is a very inexpensive tool. You can also use a paper trimmer to perform your scoring and folding, provided that the trimmer has a scoring attachment. Many of them do.
Step Four: Attaching the decorative papers. Using a good glue stick or adhesive glue runner apply some adhesive to the back of the decorative paper pieces, and attach them to the front of the invitation. Attach them so that no two of the same papers are directly next to each other. On my invitation I put two of the same papers diagonally across from each other. I made one facing right side up and attached the opposite side facing in a different direction. Step Five: Attach some ribbon bows. Cut a small length of ribbon, long enough to tie into a bow. Tie a bow with the ribbon pulling out the ends until it is the right size and shape. Snip off some of the length using scissors and cutting at an angle so that the ribbon is small enough to fit onto the square on the front of the card. Use some craft glue (I LOVE Scotch's quick dry adhesive) to attach the bow to the front of the baby birthday invitations. I would recommend making a small puddle of glue on a separate piece of paper or a paper plate and dip the bows into the glue then transferring to the face of the invite.
More ideas and tips for making baby's first birthday invitations...
* Instead of attaching bows to the front try adding some cute scrapbooking embellishments, like diapers, baby blocks or toys. It will look so cute! * Mix and match colors and papers to match a different theme or to make an invitation more suited towards a boy's birthday party.
See also...
Do It Yourself Invitations Homepage > Make Your Own Birthday Invitations > Patchwork Baby Birthday Invitations
|
The DIYI Ezine
Stay up to date with the newest tutorials, free printables and giveaways!
|
|||
|
|
||||
|
| Homepage | Shop | Wedding Invitations | Birthday Invitations | Baby Shower Invitations | Printable Invitations | Bridal Shower | Blog | Contact | Advertising Policy | Privacy Policy
By Chris Fleckenstein, Copyright © 2006-2013 Do-it-yourself-invitations.com |
||||
 * A little something extra (optional step) - The text in the upper right corner of these first birthday invitations is not a decorative paper. It is text I created and printed straight onto the card stock. I placed decorative paper all around it. To create this text block all I had to do was type the same words over and over again ("one year old") keeping it limited to just that upper right corner. Of course this step is optional because you can just as easily replace this with another piece of decorative paper instead.


