Follow Me on Pinterest


Make "Real" Footprint Baby Shower Invitations
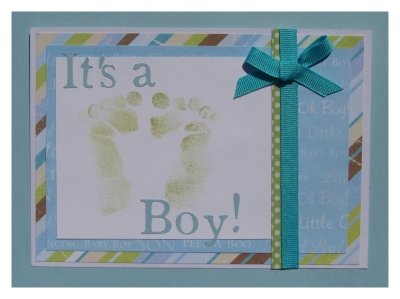
footprint baby shower invitations postcard

I originally created these foorptint baby shower invitations to use as a postcard invitations. I added the bow for this tutorial simply because I thought it looked cute and sweet. The original idea was to create a designed invitation on one side and print the postcard template and baby shower invitation wording on the opposite. You can easily keep to this theme by omitting the bow and adding a stamp instead. You can even Turn your photos in real US postage with PhotoStamps. They're perfect for every occasion! You could upload a cute graphic or even a pic of the Mama-to-be.

How to create baby footprints that look like REAL footprints!

I first started making these footprints when I was a just a kid. Every winter when the car windows would fog up from the cold I could not resist but to make these imprints all over the windows.
Needless to say that if you have kids this is a good project to have them help with. Kids love projects that have to do with finger painting, and getting your hands messy! They will love helping to make the footprint baby shower invitations!
To reduce the risk of making a big mess I would advise keeping baby wipes and paper towels handy while making your footprint baby shower invitations.

Step One: Take your hand and make a loose fist. Dip the outside edge (opposite of your thumb) into some paint or stamping ink pad to create a semi-thin coating on the side of your hand. Now make an imprint of the ink or paint onto your paper.

Step Two: Use your pinky finger to make little toe imprints.

You can use this same technique with any kind of paint, or ink pads! You could even use glue and glitter by making the imprint witrh some craft glue and then dumping some glitter on. Make sure and shake the excess off after.
These footprints are perfect for making footprint baby shower invitations as well as any favors or decorations you may want to include them on!

Instructions For Creating The Footprint Baby Shower Invitations

Material used:

  • 5" x 7" blank postcards or 8 1/2" by 11" cardstock cut to size
  • 2-3 coordinating decorative papers
  • (optional) letter stickers, letter rubber stamps, or coordinating colored cardstock
  • colored stamping ink
  • ribbon
  • glue or adhesive runner


    I used a 5" by 7" blank card to create this invitation. You can easily just have some card stock cut to size to create your postcards. You could buy blank folded cards and cut them down the middle, or even simply make this invitation into a folded card style. Whichever best suits your needs. That's the beauty of making your own invitations!

    I started by cutting my decorative papers down to size. Whenever I have a large quantity of invitations to make I bring the paper to be cut at a local copy or print shop. It's super fast and inexpensive and cuts out a lot of tedious work. They generally cut an entire stack of paper to whatever specifications I give them, in under 10 minutes and less than $10.00. Not too shabby!

    For this invitation I had four stacks of paper cut. The first was the bottom layer of decorative paper which was laid directly on top of the postcard. I had this paper cut to 6 3/4" by 4 3/4". I attached this paper to the postcard using a permanent adhesive glue runner and attached it to the card centering it as best as I could.
    For the next layer I used a coordinating colored decorative cardstock. I chose this paper because it had some sentamental wording on it. "Boy Oh Boy" and "Announcing Baby Son" and so forth. Quite fitting for the theme! This paper I had cut to 6 1/4" by 4 1/4". I attached this on top of the first layer of paper in the exact same manner.
    I also had some plain white cardstock cut to measure 4 3/4" by 3 3/4". This cardstock is the paper I used to set the stage for the main centerpiece of the footprint baby shower invitations. On this white cardstock is where I created the faux baby footprints using some green stamping ink in the manner I described above. I then attached the white cardstock to the invitation centering it from the left top and bottom sides of the upper most layer of paper, leaving about a 1/4" margin about the edges.
    The last piece of paper I had cut was the green polka dotted paper which I had cut into strips measuring 3/8" by 5". I attached this strip to the card using an adhesive runner, and placing the paper vertically over the right edge of the white cardstock piece with the baby footprints. Next I used the glue runner to apply some adhesive to the back of some ribbon and placed this vertically overlapping the right edge of the green polka dot strip of paper. I made sure the ribbon overlapped a bit on the top and bottom, then trimmed the excess away using a craft knife. I topped it all off by tying a bow with the ribbon and then attaching it to the front of the card using a few glue dots.
    The last step is to add the "It's a Boy" lettering to the front of the baby footprint invitations. I used my Cricut Expression to make the lettering out of some blue card stock. If you do not own the Cricut there are several other ways to add lettering to the card. Before I had a Cricut I used to print the lettering I would use onto the back of some decorative paper or onto cardstock so that the letters were facing backwards. I would then cut them out by hand using a craft knife. This is super tedious if you have a large quantity , however. But Don't fret! There's also Rubber stamps! Clear stamps come so that you can arrange the lettering to say whatever you want and position it how you want as well. This is a great alternative. You can also by lettering stickers or chipboard.


    More tips and techniques to create footprint baby shower invitations:

    * Expiriment with different colors and patterns of papers. Just make sure the patterns you choose do not drown out your text or footprints.

    * Try making your footprints with elmers glue and then shaking on some fancy glitter!

    * Paint your paper or chipboard letters with glue and glitter them.

    * Add extra embellishments! Add ribbon, rubber stamping or bows! The scrapbook section of any arts and crafts store have a very good selection of baby shower related embellishments also!

    * Replace the bow on the card with a photo stamp and send it as a postcard.
    (make sure any embellishments you add are glued down very well! Keep in mind postcard invitations are going through the mail and mail sorting machines!)


    Do It Yourself Invitations Homepage > Make Your Own Baby Shower Invitations > Footprint Baby Shower Invitations


  • See Also...


    The DIYI Ezine

    Email

    Name

    Then


    Stay up to date with the newest tutorials, free printables and giveaways!


    [?] Subscribe To
    This Site

    XML RSS
    Add to Google
    Add to My Yahoo!
    Add to My MSN
    Add to Newsgator
    Subscribe with Bloglines