
|
|
|||
DIY Printable Kids Birthday Invitations:
|
||||
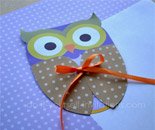
 OK, so the cat's out of the bag with these kids birthday invitations I'm featuring here today: I have a nutty obsession with Owls! Lol!
Printable Crafty & Cute Owl Invitations


How to use these printable owl templates to create your kids birthday invitations? They can be a little tricky, but I did try to include a bit of a safety net. And if you would even rather try using a die cutter to cut them all out there is a file included in the original owl invitations template just for the task.
Simply download the file to your computer and save it to your desktop or a file that you will remember to look for it in.
There is some wording inserted into the file but all you have to do to change it is to select the typing cursor, click on the text, and start typing (or deleting) away.
You can change the wording, fonts, font colors, and text size to customize the template. The fonts I used for this template was Lauren Script and Century Gothic. I believe you can get both fonts for free if you do a quick internet search.
After you have customized and personalized the template to your hearts desire, print page one on the highest quality settings for your computer. I do recommend that you use a nice heavy cardstock. I like to use a 90 lb. cardstock.
Take the printed copy and feed it back through your printer to print page 2, (or page 3 the safety net) onto the back of the first page.
After printing simply trim the invites from the paper (or have them die cut with your personal die cutter, and fold the wings inward to envelope the owl's body. For an added little personal touch I like to use a small hole punch to punch a hole on the end of each wing to thread a ribbon through. Tie the ribbon in a bow and you're done!
I really think these make super cute kids birthday invitations, and hopefully, I have covered many of the popular color schemes for an owl party! Hope you enjoy!

You Might Like...


Printable Invitations | Bridal Shower | Blog | Contact | Advertising Policy | Privacy Policy
By Chris Fleckenstein, Copyright © 2006-2013 Do-it-yourself-invitations.com