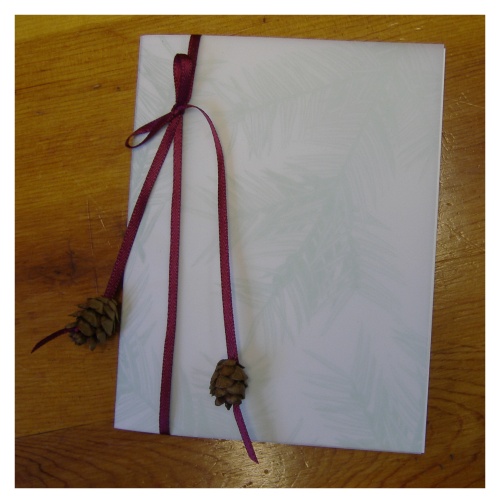
Follow Me on Pinterest


Make Pinecone Wedding Invitations

These pinecone wedding invitations bring a Christmas wedding invitations to mind. Of course anything Christmas related comes to mind when I picture pine trees, needles, and pinecones. Although to keep that theme and make them elegant is another story. So I hope the idea I came up with here will suit those of you Christmas bride's-to-be out there. I actually attended a wedding on Christmas eve last year. I must say it is indeed a beautiful time to set a wedding date. Christmas is so festive and joyous already; why not add a celebration of love to it?
These invites are actually a very easy variation on a pinecone or holiday invitation theme. The base of the invitation is actually a blank card! I simply added some printed vellum to it and tied on a couple of mini pine cones on a nice crimson ribbon. You can re-create this invite several ways, by even stamping or printing the a pine cone or pine tree image onto a blank card or vellum paper, should you have a hard time finding some printed vellum like the one I used.


Christmas wedding invitations

Materials used to make these Pinecone Wedding Invitations:
8 1/2 by 11" cream or white colored card stock
8 1/2 by 11" Christmas themed decorative paper or vellum
thin ribbon
craft glue
small Christmas decorative accents like pine cones or jingle bells
medium to large sized sewing needle


Step One: To start making these pinecone wedding invitations is to get the text for the invitations down onto paper. There are a couple ways of going about doing this. You could:

A. Purchase blank cards and print the text directly onto the cards. By blank cards I mean the kind that are completely blank - white. They are simply cut to sized and scored on the fold for easy folding. You can find these cards at most any arts and crafts supply.
This option is not necessarily the most cost effective but it is the easiest way to go about doing this task. It may cost more as the cards themselves cost a bit more than simply buying plain card stock (not to mention that sometimes the card stock they are made of is poor quality). Also, because they are sized a bit differently when you buy decorative paper to to attach to them you will have to cut this paper to awkward sizes. Doing so also causes you to waste a lot of paper since you will have smaller pieces left over for scrap. If you decide to go with this option simply print onto them using a word processor. Set the document size to the exact dimensions of your blank cards and go to town.

B. Purchase some 8 1/2 by 11" card stock in the color of your choice (not too dark - remember you must print onto it). Have the paper cut in half for you creating card stock pieces sized at 8 1/2" by 5 1/4". * Psst. by the way you can have paper cut for you very cheaply at any local copy and print shop.
Once the paper is cut for you you can use a word processor to print the words onto the paper for you. Once you have opened the word processing program make sure and choose file>page setup or document setup and set the page size to be that of the card stock. Make the page face in the landscape or wide position. Set the left margin so that it takes up half of the page to get the text to be centered into the correct position. You could also set up the page so that it has two columns and set the text up into the column on the right.

make christmas wedding invitations
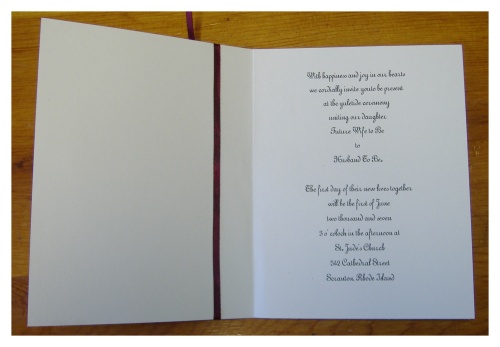
Step Two: I will assume that you have your text printed onto the paper you chose. Of course you would have also folded this paper in half. If your card stock is exceptionally thick it may be hard to fold neatly. You may need to have it scored. But what I usually do if I am having trouble with this, is I go over the fold with something that has a nice flat edge to it. I like to use a bone folder or even the edge of a ruler. Especially a wooden ruler. If you do not have one any ruler will work fine. Anything that has a flat edge similar to this will work fine also. It works to kind of "iron out" the wrinkled edges.

Step Three: Cutting the decorative paper. I chose a nice printed vellum for this invitation. It has pine needles all over it. It reminds me of a Christmas tree. What better for Christmas or holiday wedding invitations? It was a nice subtle paper.
Anyway, once you have chosen your decorative paper or vellum, you will need to cut it to fit onto the pinecone wedding invitations. If you chose to use a blank card then make sure and measure the cards dimension when it is fully open and have your paper cut to this size. Otherwise it is easiest to simply choose a paper which is sized at 8 1/2" by 11" and have it cut in half. viola!
Again, I can't stress enough how easy it is to just bring all of your papers to your local copy shop and have them cut for you. Why stop there? you can have your cards scored or your text copied onto all of the cards. It is cheap and just plain takes a lot of the stress off of you. Oh not to mention that it will save a bunch of time.

Step Four: Assembling the pinecone wedding invitations. Start by getting your ribbon ready to attach to the invitations. Do this by cutting the ribbon into several lengths of about 20 inches or so each. Next fold all of your decorative paper pieces in half to fit onto the outside of the invitations.
Use some craft glue (I like Scotch quick dry adhesive with the precision tip) to apply a thin beading of glue down the seam of the card on the outside where it folds. Place the decorative paper over the invitation so they both fit neatly together. Let this dry.
Next take a length of ribbon and place it around the front flap of the pinecone wedding invitations so that it wraps all the way around evenly. Apply a layer of craft glue to the underside of the ribbon on the inside of the card where the ribbon meets the paper. You can even apply this layer of glue using a q-tip or small paint brush. Hold the ribbon straight from top to bottom and press it gently to the card. Leave this to dry for several minutes.

Step Five: The finishing touches! Start by tying the ribbon attached to the pinecone wedding invitations into a bow onto the front of the card. Try to position the bow so that it falls closest to the top of the invitation. Now take a large sewing needle (large enough to thread your ribbon through it) and thread the end of one of the ribbon bow ends into the needle. You will use this needle to thread the ribbon through whichever kind of decoration you may have chosen. I chose to use small pine cones to thread onto the ends of the bows. My second choice would be to use some small jingle bells, or silver bells. Get creative! Maybe use some very small Christmas tree ornaments. They sell them at arts and crafts stores around the holiday season. Once you have your embellishments sewn onto the ends of the ribbon slide them up past where you want them to actually fall on the card. Make a small knot in the ribbon where you want the ornament to land on the ribbon and then slide them back to their position. repeat this for both ends of ribbon. after this task is finished snip of the extra ribbon ends with some small scissors. Make sure and snip off the edges at an angle. It just looks nicer.


More tips and ideas to make pinecone wedding invitations...

  • Play around with different papers and colored ribbons and card stock. Different combinations will produce an entirely different result and style of invitation.

  • Want to make the exact same pinecone wedding invitations I made. The pine needle decorated vellum I used is made by "The Paper Company". It is a printed transparency called "Evergreen" (10501-030). I used an antique white 8 1/2 by 11" card stock, and a maroon red thin satin ribbon. The pine cones I gathered myself in a local park but you can buy them online by going here.

  • Don't be afraid to experiment with different ornaments for the ends of the ribbon on the front of the invitation. You can find many Christmas themed decorations at arts and crafts supply stores if you shop them a few months before the holiday season.

  • Other related pages

  • Christmas wedding invitations

  • How to print onto blank DIY wedding invitations


    Do It Yourself Invitations Homepage > Make Your Own Wedding Invitations > Pinecone Wedding Invitations


  • The DIYI Ezine

    Email

    Name

    Then


    Stay up to date with the newest tutorials, free printables and giveaways!


    [?] Subscribe To
    This Site

    XML RSS
    Add to Google
    Add to My Yahoo!
    Add to My MSN
    Add to Newsgator
    Subscribe with Bloglines