
|
|
|||||
Make DIY Palm Tree Wedding InvitationsPalm tree wedding invitations are the perfect solution to a destination or beach wedding. The theme suits perfectly to any tropical motif colors and themes! There is a myriad of different palm tree graphics, stamps, stickers, and other crafting supplies that make this theme an easy one for creating DIY wedding invites and stationery. And there is tons of room to get super creative!
I created this invitation use a plain old fashioned wood mounted rubber stamp, but keep in mind that you can keep the same basic idea and twist it any way you like! These could even be made as a flat card pretty easily using one of our free wedding invitation templates.
Materials List To Make Palm Tree Wedding Invitations:
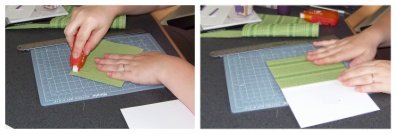
If you choose to use card stock as the base of the invitation, it may be easiest to cut it in half and make 2 cards sized at 4.25 by 5.5. Start by printing the wording to your invitations onto the inside of the card. Need help with this? We have some free printable invitation templates specifically for this kind of project (folded cards) or wedding invitation templates for all wedding stationery right down to place cards and favor tags. Once the text is printed you are ready to simply decorate the outside of the card. Start by choosing a decorative paper for the front of the card. I also really like to use handmade paper for this kind of project. But for this particular project, the paper I chose was a scrapbooking paper that had an almost cloth like texture. I chose to go with the color green to keep an organic feel to the card, plus it matched great with the leaves of the palm tree. Measure the outside of your card. This is the size you want to cut your decorative paper to in order for it to fir perfectly on the front of the palm tree wedding invitations.
I used a ruler and pencil, along with my cutting mat, to mark out where my paper should be cut. Essentially it will work best to make a kind of grid of your own. A super easy way to execute this step quickly and easily, with minimal aggrivation, is to take you papers to a print or copy shop with cutting services. If you have a large number of invitations to make, trust me, you'll be glad you did. It's generally pretty cheap to utiliza a cutting service, and you'll relieve yourself of some tedious, mind numbing work. Another thing to consider - some online paper sellers have cutting services of their own. Which means that your paper will arrive to your front door (or mailbox) previously cut and ready to assemble your invites. All at a click of a button! The Handmade Paper Superstore has this sort of cutting service and some amazing selections of paper as well. Once the decorative or handmade papers are cut to size, you just need to attach them to the card. I like to use a permanent adhesive glue runner to do this. A glue runner works best for me since it is super easy to use and there is NO MESS. All you do is drag the tool over your paper and viola! A strip of glue will appear. It keeps the object in place very securely and there is not warping or wrinkling to worry about.
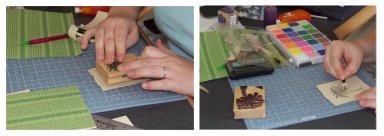
 Now on to the palm tree decoration! I used some simple colored card stock, a palm tree rubber stamp, and some blending chalk to create the palm tree emblem for the front of the invitations. Start by using a ruler and bone folder to score and tear out small squares of card stock. They need to be large enough to fit the rubber stamp image, but not to big to appear on the front of the card.
These do not have to be super perfect. If you are picky and want them to
The tearing helps to give it that little bit of extra texture, a deckled raw edge which lends a bit of a handmade paper kind of feel. Using a really good ink pad, stamp the palm tree image into the center of the card stock as straight as you can possibly make it. I find that it helps to really ink up the stamp good, then stamp it lightly onto a separate surface before you stamp onto your card stock. I used the blending chalk to add color to the palm tree. I love the effect of blending chalk. It is very soft and almost gives the effect of what watercolor paints might look like, but much easier to do and less messy. You can purchase a set of blending chalks usually, that will come with little tools that are basically the same thing as an eye shadow applying pad. You can also get away with using some egular markers, or if you want to cut costs, you might be able to get away with buying some sidewalk chalk and some eye makeup applying swabs.
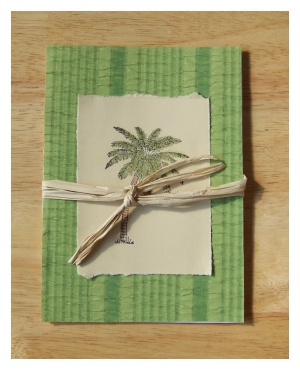
 Next go back and use the glue runner, once again, to attach the palm tree ornament to the front of the card. Try centering it to the middle of the card as straight and centered as you can. To finish the palm tree wedding invitations simply tie a bit of raffia around the outside of the card and into a knot. Trim the ends of the knot to make them even. You're done!
More tips and ideas to make palm tree wedding invitations...* Try experimenting with background papers to get the best effect and match your wedding colors * Instead of raffia try using some satin ribbon. You can even find some palm tree scrapbook paper and make little enclosure by cutting them in rectangles and securing them wrapped around the invite. Then tie a ribbon on top of it.
|
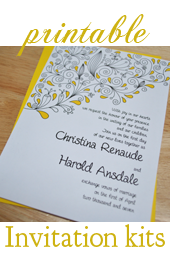
Printables and templates
You May also like |
|||||
|
The DIYI Ezine
Stay up to date with the newest tutorials, free printables and giveaways!
|
||||||
|
| Homepage | Shop | Wedding Invitations | Birthday Invitations | Baby Shower Invitations | Printable Invitations | Bridal Shower | Blog | Contact | Advertising Policy | Privacy Policy
By Chris Fleckenstein, Copyright © 2006-2013 Do-it-yourself-invitations.com |
||||||
 The base of this invitation should be either a blank card or some card stock folded in half. I used a blank card sized at 4.5 by 6.25. Really you can make this card any size you want and just adjust the size of the papers to accommodate.
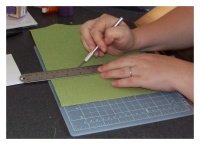 Many scrapbooking papers have a grid printed onto the back to make sizing paper an easy task. Mine did not, of course.
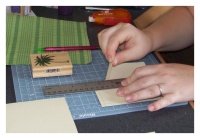 be perfect go back to drawing a grid on the paper with a pencil and ruler, and use the grid to tear straight lines.


