
|
|
|||
|
Make Diaper Baby Shower Invitations
These invitations are so adorable and have so much potential for creativity! Instead of adding a tag as I did on the invitation shown, you could attach stickers just below the diaper pin. You could tie a little bow with some satin ribbon onto the diaper pin. You could even add beads to the pin, or glitter the diaper pin closure! Or how about cutting out the diapers with some scallop edge birder scissors for a cute "lacey" edge. Experiment with different colors, patterns, and textured papers. Get creative and have fun with it!
Step Two: Create the paper "diaper" using our printable template. I provided two different templates for creating these diaper baby shower invitations. The first is a simple PDF to print out. You could print it onto the back of some 8 1/2" by 11" decorative paper or colored cardstock. Use the guidelines to cut the diaper out by hand. Step Three: Fold the Diaper papers around your invitation inserts. First fold the diaper in half vertically by bringing the bottom edge to meet with the top. One you have placed this crease open the paper and place the invitation insert into the diaper. Center it into the middle. Now fold the flaps on the left and right in towards the middle. Use a little adhesive, such as permanent glue runner or glue dots, just under each flap to keep it in place. Step Four: Punch two small holes just inside of the closed flaps.You may want to measure and place dots with a pencil to make sure all invitations have uniform holes. Insert a diaper pin through the holes and then close it to attach it to the front of the invitation. It will have the appearance of holding the diaper shut.
Step Five: Embellish! For my invitations I created a small tag using white card stock and my Cricut Expression machine. You could also buy a tag shaped paper punch, or buy tags that are already cut. My tags are 1 1/2" long.
More ideas and tips to make your own diaper baby shower invitations... * Switch up the decorative paper themes and embellishments to change this invitation to match any baby shower theme or color scheme. * Forgo the tag decoration and get creative! Add a decorative sticker placed right onto the diaper. Or even simply tie a small bow with some fancy ribbon onto the diaper pin.
|

The DIYI Ezine
Stay up to date with the newest tutorials, free printables and giveaways!
|
|||
|
|
||||
|
| Homepage | Shop | Wedding Invitations | Birthday Invitations | Baby Shower Invitations | Printable Invitations | Bridal Shower | Blog | Contact | Advertising Policy | Privacy Policy
By Chris Fleckenstein, Copyright © 2006-2013 Do-it-yourself-invitations.com |
||||
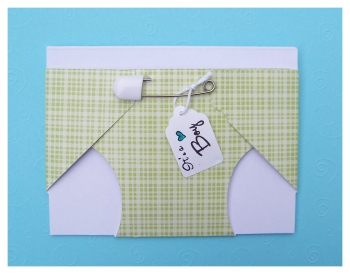 These diaper baby shower invitations are so cute and easy to make. I have included a printable template to use in creating the diaper shape. You can print out our PDF template onto the back of some decorative paper or colored cardstock and cut the diapers out by hand. Or you can purchase our SVG file to use with your


