|
|
|
|
DIY Roasting Marshmallow Save-the-date Magnets
by Kerrie & Chris
A Campfire WeddingWe had a lot of fun doing this project and worked together through the whole process-from brainstorming to putting them in the mail. Our wedding is being held at Kingsley Pines in Maine. This amazing venue is a children's summer camp and we love the feel of the place. We will definitely be roasting marshmallows by campfires at some point of our weekend. We had several ideas about what to do for our save-the-dates but both agreed on this idea (we thought of the idea ourselves and then went to the crafts store to see how we could make our vision come to life.) We purchased bundles of decorative branches from the craft store and Chris cut them and “widdled” (that is what he called it, apparently it isn’t a real word) one end of each stick. Next we purchased foam shapes that resemble marshmallows from a craft store. We used rubber stamps (with an ink pad for the red and acrylic paint for the blue- b/c we couldn't find a match) to create the message. We sprayed the ink with a clear spray-on sealant (our prototypes smudged). We pierced each marshmallow through the center with a bead reamer, and then carefully twisted each stick through 2 marshmallows. We purchased strong mini magnets online. We screwed a tiny flat head screw into the back of each marshmallow and used super glue to secure each magnet to each screw. We purchased red mailing tubes in bulk online. We downloaded a campfire and marshmallow roasting graphic from online. We bought a large rubber stamp that looks like the grain of wood and stamped several sheets of white stick-on labels using acrylic paint. We made a template for the addresses on the computer and ran the stamped labels through the printer and created each label. We then covered the painted address label with a clear stick on label of identical proportions, (to ensure that the paint would not get damaged while traveling to our guests). We wrapped each marshmallow magnet in bubble-wrap, rolled our save the date notices around the bubble wrap on each stick and secured it with a red fabric ribbon. (We downloaded free graphics and used a basic word processing program to create our save the dates). 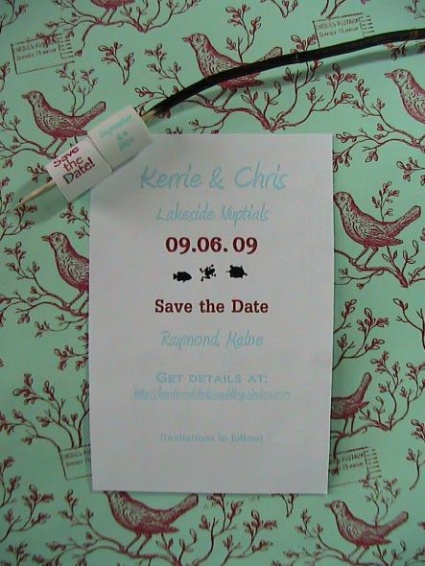 You May Also Like...
|
Popular DIY Tutorials |
|
|
|
||
|
| Homepage | Shop | Wedding Invitations | Birthday Invitations | Baby Shower Invitations | Printable Invitations | Bridal Shower | Blog | Contact | Advertising Policy | Privacy Policy
By Chris Fleckenstein, Copyright © 2006-2013 Do-it-yourself-invitations.com |
||


