|
Autumn Wedding Invitations
Make Your Own Autumn Wedding Invitations With A Rustic Feel
I just love a fall or autumn wedding. I love the rustic and earthy themes and colors that go along with them. The leaves are turning colors. Out come the apple and pumpkin picking! Incorporating these themes into a handmade wedding invitation can seem challenging, but you absolutely can pull it off, and do it with grace and style!
I created this autumn wedding invitation for a very rustic wedding. The setting was in the woods in Maine, in September. The wedding and reception were to take part at a lodge in the woods, mainly outside amongst the pine trees, in a setting of outdoor canvas tents decked out with pumpkins, apples, and plush oriental rugs. There were bonfires and bluegrass bands. This called for a special kind of invite with a very earthy, rustic feel!
Autumn Wedding Invitations Material and Supplies list:
Handmade paper (earthy colors)
cardstock
glue runner or adhesive
ribbon or raffia
bone folder
optional
paper cutter
rubber stamp
ink pad
How To Make These Autumn Wedding Invitations
I started by purchasing some really cool and earthy, rustic handmade paper from Creative Papers Online. They have the most amazing selection of papers. I can't help but go crazy when I am shopping in their store since they always have sales and SO MANY cool papers to choose from. Not to mention oodles of papers that are simply perfect for fall or autumn wedding invitations Most of the handmade papers offered in their online store are very large sheets. This particular paper that I bought was around 20" by 30". The gist being, you're going to have to have the paper cut down to size in order to use it. OR, cut the paper yourself. I cut mine by hand (actually more like tore it by hand,haha). But here is a bit of good news; Creative Papers will actually cut it for you. AND it only costs $12.00. That is affordable and a HUGE time saver!
 So here's what I did. First off, I must really like self torture because I cut all of the paper myself. Well, like I mentioned, I actually tore the paper by hand. I really wanted to keep that rustic earthy feel to the paper. So tearing it would allow me to keep a very natural looking edge. I wanted to the invitations to be somewhere around 5" by 7" to keep them in a more standard size envelope, so made some measurements and came up with the size I needed to cut the paper down to. To figure this out, all you need do is measure (or imagine up) the size of the cardstock that you will place onto the inside of the invitation. 5 by 7 is a very good size to go with. Very standard for an invitation. I wanted the outer flaps of paper to fold over the front of the invitation, but not completely wrap around so I added 3-4" to either size (3.75" + 3.75" + 5" = 12.5" long). In the end the size of the outer handmade paper wrap was 12.5" by 7". So here's what I did. First off, I must really like self torture because I cut all of the paper myself. Well, like I mentioned, I actually tore the paper by hand. I really wanted to keep that rustic earthy feel to the paper. So tearing it would allow me to keep a very natural looking edge. I wanted to the invitations to be somewhere around 5" by 7" to keep them in a more standard size envelope, so made some measurements and came up with the size I needed to cut the paper down to. To figure this out, all you need do is measure (or imagine up) the size of the cardstock that you will place onto the inside of the invitation. 5 by 7 is a very good size to go with. Very standard for an invitation. I wanted the outer flaps of paper to fold over the front of the invitation, but not completely wrap around so I added 3-4" to either size (3.75" + 3.75" + 5" = 12.5" long). In the end the size of the outer handmade paper wrap was 12.5" by 7".
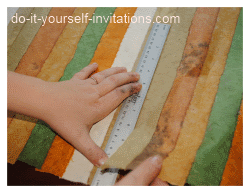
To tear the paper, rather than cutting it on my personal paper cutter, I used a bone folder and a ruler to crease the paper so that I could tear it in a perfectly straight line. First I used the ruler to measure the size I needed to cut and create some guidelines for cutting using a light pencil. After scoring I laid my ruler down along the score mark and simply started tearing away!
 Just a word of advice; If this is your first time creating invitations like this you may want to complete just one invitation to get the feel of the process, and then go back and create them in bulk. Don't forget to get some help! Especially if you are making hundreds! Just a word of advice; If this is your first time creating invitations like this you may want to complete just one invitation to get the feel of the process, and then go back and create them in bulk. Don't forget to get some help! Especially if you are making hundreds!
So to move on, after cutting all of my paper folders, I created the wording for the invitations to attach to the inside of the handmade paper. I used some desktop publishing software to lay out the text to print two to a page. You can easily do this yourself using one of our free printable invitations templates. The template is an interactive PDF file which most anyone can use.
I printed the wording onto some high quality standard sized (8 1/2" by 11") cardstock. After printing them I then moved on to cut the invites down to size (5" by 7") to place into the inside of the handmade paper.
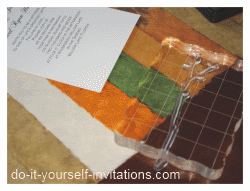
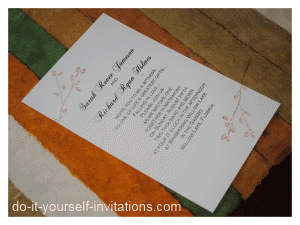 To add some interest, and this is completely optional but I think it really adds a little something to the invitation, I added a rubber stamped image to the cardstock. I had a stamp with the image of a branch with leaves that I chose to stamp at both the top and bottom of the cardstock insert. I used a great metallic bronze ink that I had on hand which went perfectly with the theme and coordinated seamlessly with the colors within the paper. To stamp this image I used a clear cling stamp so I also had to use a clear acrylic block to mount the stamp onto before stamping the image. I absolutely LOVE clear stamps! You can actually see what you are doing (and where the image will appear) when using them, so there is much less chance of fudging it. :-) To add some interest, and this is completely optional but I think it really adds a little something to the invitation, I added a rubber stamped image to the cardstock. I had a stamp with the image of a branch with leaves that I chose to stamp at both the top and bottom of the cardstock insert. I used a great metallic bronze ink that I had on hand which went perfectly with the theme and coordinated seamlessly with the colors within the paper. To stamp this image I used a clear cling stamp so I also had to use a clear acrylic block to mount the stamp onto before stamping the image. I absolutely LOVE clear stamps! You can actually see what you are doing (and where the image will appear) when using them, so there is much less chance of fudging it. :-)
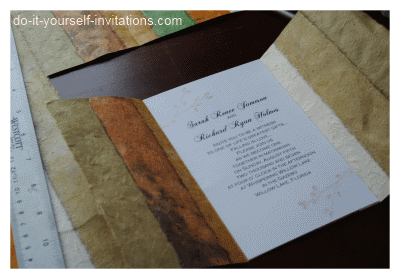
To create the autumn wedding invitations, the next step is to prepare the handmade paper to actually attach the cardstock to the inside of it. Since you will be folding the paper in onto itself the best thing to do is score it first. Scoring is basically just creating a crease in the paper so that when you fold the paper it will fold with a perfectly clean and creaseless fold. To score the paper in exactly the right spot I used a centering ruler to mark where to score. A centering ruler is a kind of ruler in which the measurement starts from the exact middle point on the ruler and proceeds outwards. By using this kind of ruler you can find the exact middle point of the paper easily. BTW, you can get a centering ruler cheap as anything in any craft store or even in the scrapbooking section of Walmart or Target.
Find the center point and (assuming that your invitations are 5 x 7) measure 2.5" outward on wither side. Make a very light mark with a pencil just and 1/8" outside of this. Use a ruler and a bone folder to score the paper on both sides. Fold the outer edges inward, folding from left to right and vice versa.
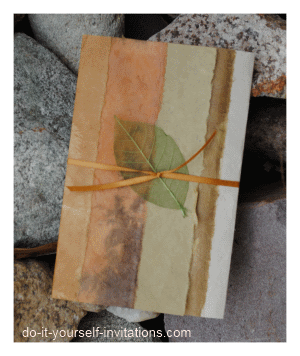
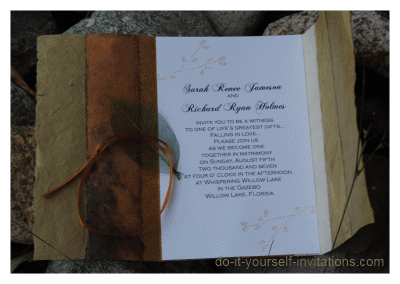
To finish everything up I simply tied a ribbon around the outside of the autumn wedding invitations and tucked in a couple of green skeleton leaves. The result is both beautiful and rustic. Perfect for a fall or autumn wedding!
Making Handmade Autumn Wedding Invitations? You may also be interested in....
Do It Yourself Invitations Homepage > Make Your Own Wedding Invitations > Autumn Wedding Invitations
|



 So here's what I did. First off, I must really like self torture because I cut all of the paper myself. Well, like I mentioned, I actually tore the paper by hand. I really wanted to keep that rustic earthy feel to the paper. So tearing it would allow me to keep a very natural looking edge. I wanted to the invitations to be somewhere around 5" by 7" to keep them in a more standard size envelope, so made some measurements and came up with the size I needed to cut the paper down to. To figure this out, all you need do is measure (or imagine up) the size of the cardstock that you will place onto the inside of the invitation. 5 by 7 is a very good size to go with. Very standard for an invitation. I wanted the outer flaps of paper to fold over the front of the invitation, but not completely wrap around so I added 3-4" to either size (3.75" + 3.75" + 5" = 12.5" long). In the end the size of the outer handmade paper wrap was 12.5" by 7".
 Just a word of advice; If this is your first time creating invitations like this you may want to complete just one invitation to get the feel of the process, and then go back and create them in bulk. Don't forget to get some help! Especially if you are making hundreds!
 To add some interest, and this is completely optional but I think it really adds a little something to the invitation, I added a rubber stamped image to the cardstock. I had a stamp with the image of a branch with leaves that I chose to stamp at both the top and bottom of the cardstock insert. I used a great metallic bronze ink that I had on hand which went perfectly with the theme and coordinated seamlessly with the colors within the paper. To stamp this image I used a clear cling stamp so I also had to use a clear acrylic block to mount the stamp onto before stamping the image. I absolutely LOVE