
|
|
||
|
Make These Unique Baby Shower Invitations
|
|||
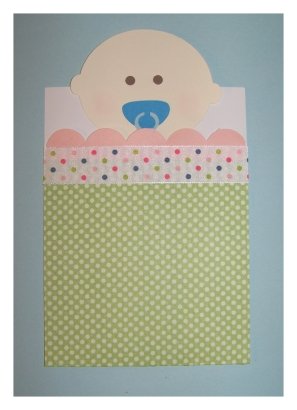
These super cute and unique baby shower invitations are sure to induce some "oohs" and "aaaahs", not to mention smiles, from their recipients and guests to your baby shower bash. I made these partly by hand and also using my my personal die cutter and Sure Cuts A Lot software. But they could easily be made by cutting everything by hand and using paper punches. I am including the SVG files for those of you who are savvy to electronic cutters and/or SCAL.
But do not be discouraged by the fancy tools I used. These can be made using paper punches, good old fashioned scissors, and some page trimmers. I just took the easy way out. :-)
Materials you'll need to create these unique baby shower invitations:
- 12 x 12 decorative paper
- peachy flesh colored cardstock for baby head
- 3 coordinating cardstock colors for blanket trim and binky
- brown, blue, or green, paper for eyes (could also use marker
- Thick Ribbon
- adhesive
Choosing A Paper
I started by choosing a decorative cardstock for the base of the card which will also become the baby's blanket/bunting. I chose a 12" by 12" green polka dot cardstock. I cut the cardstock in half and then trimmed an inch off to create two 12" by 5" pieces of paper.
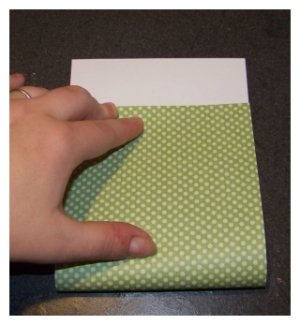
Make A Pocket
To create the pocket for these unique baby shower invitations, I measured about 1 3/4" down from the top of the card holding it the long way vertically. I brought the bottom edge of the card up to meet at the measured point and folded the paper. Next I used a permanent adhesive glue runner to apply some glue to the outer inside edges (left and right) of the paper. I folded the card shut sealing the edges creating a pocket.Creating Embellishments
Next I created my accent pieces. I used my cricut and an SVG file I created to cut out the necessary pieces. But you could also draw the shapes by hand and create a pattern to cut them all by hand.
I used a creamy colored cardstock for the baby's head, two shade of blue cardstock for the binky, brown for the eyes, and pink for the scallop edged ruffle. I used a circular paper punch to create the eyes. You could also use a border trimmer to create the scallop edge.Holding It All Together
I used some quick dry adhesive with a precision tip tube to glue the pieces together to create the baby. I attached the scallop edges to my paper using a glue runeer and the same for the baby head by applying the adhesive to the back and placing it on the card. I then covered the seam where the scallop shaped paper "ruffle" meets the polka dot paper using some thick ribbon. I used the glue runner to attach the ribbon, then trimming the edges off after attaching it to the card.The Finishing Touches
To finish the invitation I printed the wording onto a separate white card which I embellished with rubber stamps and placed it inside the pocket of these unique baby shower invitations. I got so many compliments on these!
Have you recently made your own invitations?
Want to share them with us?Have your handmade invitations featured on our Do It Yourself Invitations!
Just visit our Reader Submissions Page and tell us about your handy work!
Do It Yourself Invitations Homepage > Make Your Own Baby Shower Invitations > Unique Baby Shower Invitations

The DIYI Ezine


Printable Invitations | Bridal Shower | Blog | Contact | Advertising Policy | Privacy Policy
By Chris Fleckenstein, Copyright © 2006-2013 Do-it-yourself-invitations.com