
|
|
|||||
|
Make Your Own Cherry Blossom Wedding InvitationsThere are many ways to go about turning this template into a beautiful and stylish handmade invitation. You could simply leave it black and white for a more formal black and white style invitation. Or you can hand color the flowers and leaves and turn this into a personal work of art. I want to walk you through the steps to turn this cherry blossom wedding invitations template from a plain old "print your own wedding invitation" into a wedding invitation that your friends and family will not even realize you made yourself.
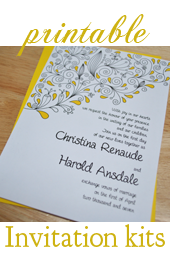
How To Print Your Own Wedding Invitations Using Our DIY Template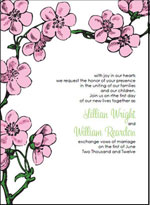 Our printable invitation kits are available in small sets including an invitation, RSVP, and thank you note, or the deluxe kit which contains much, much more. The deluxe kit also offers STD, programs, place and table cards, menu cards, and more. For more info, to see samples, or download a template visit our Printables Shop. Once you have your template printed onto a nice high quality cardstock, you will notice there are cutting marks on the page. Our templates place two invitations to a page so that one single sheet of paper will create two cherry blossom wedding invitations. I like to use a rotary paper cutter to trim my cardstock. A guilotine can also be used. If you have a large quantity of invitations to make it is sometimes more feasible to bring your invitations to a print or copy shop to have them cut professionally. These shops often have large hydraulic paper cutters designed to cut large stacks of paper in one single cut. Not only will your invitations be cut with precision, but also in a matter of minutes. AND it is generally very affordable. I spent under $10.00 when I last brought a stack of invitations to be cut.
Adding Color to Your Cherry Blossom Wedding Invitations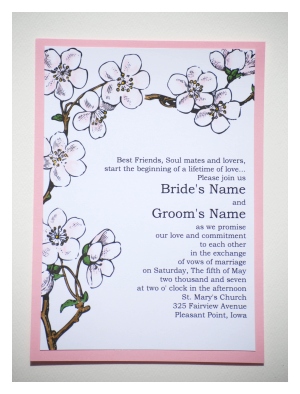 Blendable Chalk - For a very soft look I added some soft pink to the petals on this invitation by using blendable chalk. You can find this kind of chalk (they almost look like little paletts of watercolor cakes) at most any arts and crafts store. I found mine in the cardmaking department. To color the invitations you apply the color to paper using something that looks pretty much the same as an eye shadow applicator. I've also used Q-tips in the past. The palettes usually come with several applicators. I used a high quality marker with green ink to color the stems and leaves. Blendable Chalk - For a very soft look I added some soft pink to the petals on this invitation by using blendable chalk. You can find this kind of chalk (they almost look like little paletts of watercolor cakes) at most any arts and crafts store. I found mine in the cardmaking department. To color the invitations you apply the color to paper using something that looks pretty much the same as an eye shadow applicator. I've also used Q-tips in the past. The palettes usually come with several applicators. I used a high quality marker with green ink to color the stems and leaves.Markers - An easy way to add color to these cherry blossom wedding invitations would be to simply use markers. There are several types of markers available to choose from, however, I recommend using as high a quality marker as you can find. The reason being, the quality will show in your invitations. Besides, higher quality supplies will be much easier to work with. You most likely only need two-4 colors to work with, so I say splurge on the best! I really like Copic markers. Buying these in a set is quite expensive, but if you can limit it to only the colors you'd like to use then it shouldn't be too bad. Watercolor Pens - One way to try and get the effects of watercolor painting without actually taking out a paint brush is to use watercolor markers. These are designed to give the appearance of watercolor. They are easier to use and guaranteed to not leave as much of a mess. Although the end result will not be quite as great as actual watercolor paints.
Handpainted Watercolor - This is my preferred method although the most tedious. It takes some real determination to painstakingly paint each and every petal and stem over and over throughtout each and every invitation. But the result is gorgeous. And do not be afraid to expirament with this one. The paints are mostly inexpensive, and you will only need a few colors. If you decide it's not for you there isn't much of a loss.
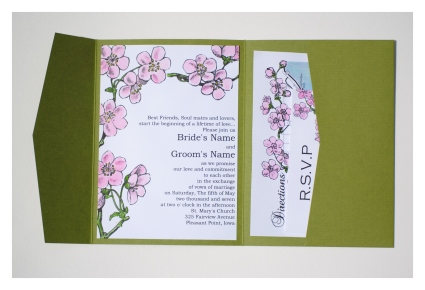 This invitation was made as a sample for a client who wanted hand painted cherry blossom wedding invitations in a pocketfold with a custom invitation map, which I also added the handpainted decoration to.
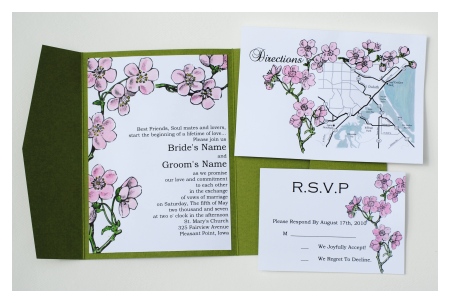
Layering Papers - Finishing Your InvitationsAs I've said above, these invitations can be printed on extra heavy cardstock, cut, and placed in an envelopes as is (after adding some color of course). But I like the look of layered papers. I like to add a bt more pizzazz to these invitations.The easiest way to layer these invitations with an accent paper is to simply pick an 8 1/2" by 11" standard sheet of colored cardstock and cut it to size. These invites are sized 5" by 7" after cutting them, so you will want your cardstock to be cut a bit larger to accommodate the sizing. What size you choose to cut it really depends on your taste. I personally like about 1/4" margin around the outside of the invitation. So I would cut the colored cardstock to 5 1/2" by 7 1/2". Th easiest way to do this is to simply cut it in half, and then trim one end. To attach the cherry blossom invitations use a permanent adhesive glue runner. Using these nifty little tools you can simply drag a bit of adhesive across the back of the paper. No mess, no fuss. Then simply center your white cardstock (with the cherry blossoms) over the colored cardstock backing, and attach them together so they are as centered as possible. From there you can add a belly band, or tie a ribbon around. You can also use our invitation templates to make pocketfold wedding invitations. Use the same methods as above, although you may want to trim the cherry blossom wedding invitations template a bit smaller to fit into the pocketfold. Many pocketfolds are 5" by 7" so that using our cutting marks the invitation will fit with no margin around the outside. I like to cut it a bit smaller to show a margin of colored cardstock. Although, it is all about whatever you think looks best, so use your own judgement.
have you made your own cherry blossom wedding invitations using our template? We'd love it if you added them to our Invitations Show and Tell Gallery!!
|
The DIYI Ezine
Stay up to date with the newest tutorials, free printables and giveaways!
|
|||||
|
|
||||||
|
| Homepage | Shop | Wedding Invitations | Birthday Invitations | Baby Shower Invitations | Printable Invitations | Bridal Shower | Blog | Contact | Advertising Policy | Privacy Policy
By Chris Fleckenstein, Copyright © 2006-2013 Do-it-yourself-invitations.com |
||||||


