|
|
|
|
Message in a Bottle Destination Beach Wedding Invitation
by Barbara

Message in a Bottle Invite
My fiance and I are getting married in Lake Tahoe, NV this upcoming August :D 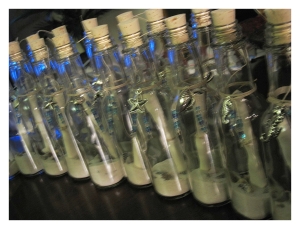 WHAT YOU NEED FOR THE BOTTLES: - 6 1/2 INCH TALL GLASS BOTTLES I wasn’t able to find this size bottle at any of the craft stores in my area. Or boxes. I did however find bottles AND boxes from http://www.sandartsupplies.com/ for a reasonable price + S&H. - BEACH DECOR SAND Brand: I used ACTIVA PRODUCTS INC. – sold at Michaels - MINI SEA SHELLS I found these at Michaels right next to the sand. - METAL CHARMS Brand: BLUE MOON BEADS: “Tokens” and “Lost & Found” designs– sold at Michaels. Each of these packs come with 6 designs. - GLASS BEADS Brand: JEWELRY ESSENTIALS - the pack came in white, light blue, and medium/dark blue shades. Item# JC11277-13 - HEMP CORD(or raffia or some other type of string) Brand: JEWELRY ESSENTIALS: NATURALS 10 lb hemp cord – sold at Michaels - GORILLA GLUE or super glue - SMALL PAINT BRUSH to brush the glue on HOW TO MAKE THE BOTTLES - Fill each bottle with 3/4 inch to 1 inch of sand. - Drop in a variety of seashells – however many you need to make it look nice. I filled each bottle with 1 to 2 “big” shells (whatever would fit in the small bottle opening) and then filled it up with smaller shells – different styles, colors, etc to give it variety! - Wrap the hemp cord around the neck of the bottle, weaving the ends of the hemp cord through the charm and back again as many times as the charm loop allows. Tie a knot (under the charm). Two hemp cords will now dangle under the charm. String the glass beads onto the hemp cord and when you have as many as you want, tie two knots to secure the beads from falling off. Do the same for the second piece of hemp cord. - On the backside of the bottle from where the charm is, you will want to secure the hemp cord to the bottle – otherwise it will slide off as the neck bottle tapers. I used Gorilla Glue since that is all I had laying around the house and it worked great. I used a small paint brush (it will get ruined so use a cheap one) to lightly brush glue onto the glass/hemp. I left it to dry overnight. - The bottles are done! Now time to add your invites!!! WHAT YOU NEED FOR THE INVITATIONS 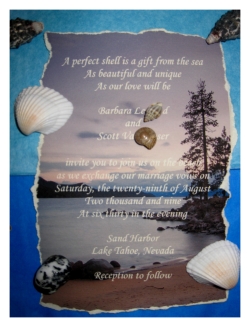 - Parchment paper if available. I used some premium quality paper I had laying around that I was using for resumes earlier in the year and it turned out great! - I designed the invitation to be approx 4 inches wide and 5 1/2 inches long. - I found a cool image on the internet of Sand Harbor (Lake Tahoe Beach Park) and used that for the background of our invitation. - I opened up with a cute beach theme poem/saying: A perfect shell is a gift from the sea As beautiful and unique As our love will be and filled in all the other important information an invitation should have. As of yet, we haven’t found a reception site, otherwise I would have included a really cool map to the site. I definitely recommend making a “treasure” map. I was in a rush to get the invitations out so I had to do without it. - After printing out the invites, tear the paper along the border to give it a worn/weathered look. You can brown the edges too if you’d like. - Roll up the paper into a small scroll and secure with the hemp cord. Make sure to leave about 5 1/2 inches to 6 inches of the cord to hang outside of the cork a little bit. You want your guests to be able to pull the invite out of the bottle. - Drop the scroll into the bottle and secure with the cork. SHIPPING NOTE - The really cool thing about the boxes we ordered along with the glass bottles is that the boxes were MADE FOR the bottles. Your message-in-a-bottle will fit snuggly in the box. I used two shades of blue tissue paper inside the box to represent water. If you’re concerned about breakage, you could always use bubble-wrap or Styrofoam. |
Popular DIY Tutorials |
|
|
|
||
|
| Homepage | Shop | Wedding Invitations | Birthday Invitations | Baby Shower Invitations | Printable Invitations | Bridal Shower | Blog | Contact | Advertising Policy | Privacy Policy
By Chris Fleckenstein, Copyright © 2006-2013 Do-it-yourself-invitations.com |
||