
|
|
|||
|
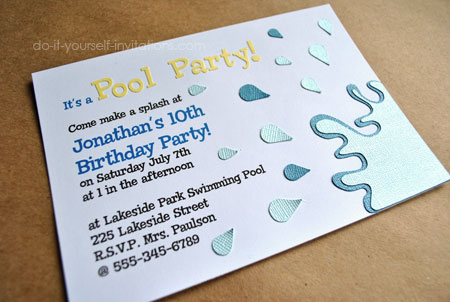
Make Your Own Pool Party Invitations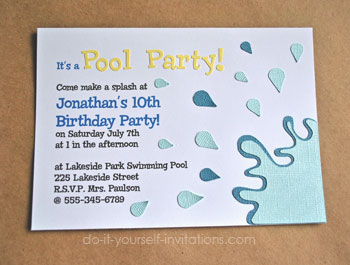 Make these pool party invitations for your upcoming summer parties! The pool party is the epitome of a summertime bash, but these could be used for a variety of summertime "splash" parties! Make these pool party invitations for your upcoming summer parties! The pool party is the epitome of a summertime bash, but these could be used for a variety of summertime "splash" parties!
What immediately comes to mind is a water gun party, a slip and slide party, or even a water balloon fight party! All fantastically fun ideas! These invites are both simple and easy to make. I have included a few template and pattern pieces to help making these invites a snap. I really hope you enjoy them!
I have included some files for all of you die cutting divas out there! But if you don't have a personal die cutting machine, do not fret! I also have a printable PDF file template that you can simply print onto the back of your colored cardstock and then trim with a good sharp pair of scissors! Experience tells me that this will look just as cute on the finished product as the die cut pieces. It just takes a little bit more effort. Step 1: Start by creating your 5 by 7 invitations using our free printable invitation templates. Use the template to format your invitation wording. To use the template simply download the file and save it to your desktop. Open the file, place the cursor on the page and start typing up the wording for your pool party invitations. You can change the fonts, text color and sizes by pressing Control and E at the same time and using the typing tool pop-up. Print the file onto some standard white cardstock at your printer's highest quality settings.
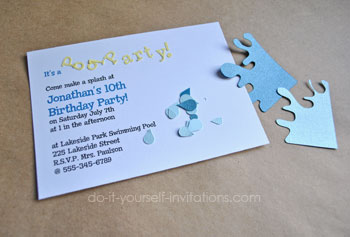
Side Note:You may want to leave out the wording "Pool Party" from the printed invitation if you intend to use a die cutter or paper punch to create the letters for this. Although, it will look nice to print the words in some nice bold colors as well!BTW the font I used here for these invites is called Chowderhead by Font Diner and you can get a copy for yourself at MYfonts.com
Free Pool Party Invitations Templates & Patterns:
Apply some glue to the back and attach the two splash pieces to the lower right hand corner of the invitation. Next arrange the water drops and glue them all over the invitation to look like the water is splashing across the invites. That's it! You're done. A great optional step is to pick out some matching decorative paper and create some crafty envelope liners for the invitation envelopes!
|
The DIYI Ezine
Stay up to date with the newest tutorials, free printables and giveaways!
See Also...
|
|||
|
|
||||
|
| Homepage | Shop | Wedding Invitations | Birthday Invitations | Baby Shower Invitations | Printable Invitations | Bridal Shower | Blog | Contact | Advertising Policy | Privacy Policy
By Chris Fleckenstein, Copyright © 2006-2013 Do-it-yourself-invitations.com |
||||
 Step 2: Trim the paper to 5 by 7 invitations using the nifty cutting guidelines on the print out, and using a personal paper trimmer.


