
|
|
|||||
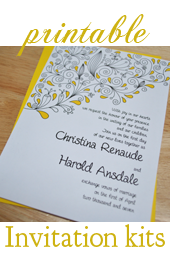
Do It Yourself Wedding Invitations
|
||||||

So I thought it high time to write up a useful help page to get you started printing onto your do it yourself wedding invitations kit, as well as some helpful tips about using your printer to it's fullest, AND, how to personalize your kit.
The Cheapest Wedding Invitations On The Planet
Well it's not the biggest secret in the world, but It's my number one tip to saving money when purchasing a Do It Yourself Wedding Invitations Kit. Coupons!I noticed that these kits go on sale pretty often. Ans the sales are good, but to really reap the savings you need to be patient.
Many of the larger chain hobby and craft stores release coupons weekly, but if you wait a week or two they will eventually have "special" sale days when you can use a 50% off coupon, AND sometimes they even have 20% off an entire purchase even when you buy sale items!
When you can snag one of these sales grab a friend and head to the store early, armed with printable coupons for you both. Go to town! You can get ALL of your supplies and your printable invites for 50% off and more!

Printing Onto Your DIY Invitation Kit
There are several programs suitable to use for printing the wording onto your do it yourself wedding invitations. The most common? Microsoft Word.If you don't happen to have Word installed on your computer, you can also download Open Office for free online. Most word processing programs work very similar to word, so these instructions can still apply, loosely, to whichever software you're using.
1. Page Set-up
The first step you will need to take is figuring out the dimensions of the invitation and inserts that you will be printing onto.
Open the program on your computer and choose File > New > Blank Document.
A new document will open with a blank page. Next you will need to change the page sizing to match those of the blank invitation you are printing onto.
Select The Page Layout tab, and then click the Page Sizing button.

A drop down will display showing many common page and card sizes. In my case, the invitation size (5.5 by 8.5 - half page) was not listed. So I chose More Page Sizes and entered the dimensions manually.
Next to change the page margins. The kit I printed onto had a small decorative accent at the top and bottom of the page, so I created margins large enough to account for the size of the printed graphics.
Click on the Margins button. If any of the pre-loaded margin settings will work for you, great, you're golden. Select it! Otherwise, scroll down to where it says Custom Margins.

Measure the dimensions of any printed graphics on the page and enter those into the correct spaces.
2. Formatting The Text/Invitation Wording
Select the Home tab an start by typing the wording for your do it yourself wedding invitations into the document. If you need some quick references for writing your wording try out invitation wording samples page.
Highlight the text and choose an alignment and sizing.
- It is common to use a fully centered alignment on a wedding invitation. In my opinion, depending on the style and design of an invite, a centered alignment can be weak.
If you have an invitation whose primary design and graphics are centered, go with a centered alignment. BUT if you have a graphic that is left or right aligned, I fully recommend aligning the text to the opposite edge of the paper (with at least a half inch margin form the edge of the paper).
- When choosing the sizing, I recommend straying away form the default 12 point font. I find it slightly juvenile, and much too large. A nice 10 point font is my favorite, but always test at least one print before running off all of your invites. Some fonts appear larger or smaller than others. The last thing you want is a ton of invitations that people have a hard time reading!
- Add some contrast between fonts and sizes. I like to make the names and the rest of the info in completely different fonts and sizes. Contrast adds interest, texture. For it to be effective the fonts need to be completely different styles. Play around with it until you find the right combination.

Add Some Color To Those Do It Yourself Wedding Invitations!
Make your do it yourself wedding invitations kit look not-so-DIY. I absolutely adore adding some nice bright color to the bride and grooms names.
If you are using a contrasting or coordinating color, play around with different colors on the names until you find one that "goes".
What works best are either contrasting (think "color opposites") or colors in a couple shades darker than those that are dominant on the invitation.
To change the color of the text highlight the portion of text you wish to change, and then select the text color palette.
This will display a drop down of color palettes and the option for "more colors". Choose a couple or a few and print out some samples onto plain paper to see how they compare against your invitation colors.

Printing It!
Always, always print a copy onto scrap paper or plain paper before printing onto your blank invitations.
Do this for two reasons. One is to make sure everything is spaced and lined up correctly. The second is to check the alignment of your printer so you know which direction to insert your paper.
 Either way you'll hate to waste even one scrap of paper from your do it yourself wedding invitations kit, no matter how cheap it may have been.
If you are using a plain piece of paper you may want to write something on it to remember what direction you placed it into your printer, ad then check it against which direction the text is facing when it comes out the other end.
Either way you'll hate to waste even one scrap of paper from your do it yourself wedding invitations kit, no matter how cheap it may have been.
If you are using a plain piece of paper you may want to write something on it to remember what direction you placed it into your printer, ad then check it against which direction the text is facing when it comes out the other end.
Best Printing Practices. Always remember to:
1. Feed the paper or blank invitation through the manual tray
Some printers just cannot handle a heavier weight (thickness) of paper. Save yourself a lot of time and hassle and just feed it through the manual, or rear tray.
Don't forget - check your printer settings and let your printer know to look for the paper in the manual tray. Otherwise you will still have problems.
2. Print at your printer's highest quality settings. It really does make a big difference. It may take up more ink, but your invites will look gorgeous. Most will not even realise that you actually made them yourself!
Part Two - The R.S.V.P.
I am addressing this issue because many times, and this even goes for the invitation in some cases, the response cards are set up to print two to a sheet. As were the ones in which I printed onto for this tutorial. They had a perforation line to separate the two pieces after printing.
Follow all of the step above, but make sure and turn on the rulers to make sure the wording s centered in the correct spots.
In Microsoft Word, to be able to view the rulers on the page select the View tab, and then check the box that says "rulers".
Here's a handy tip - sometimes when you tear on the perforation line, you get a messy edge left over. I actually cut on the line using a paper cutter and it comes out fabulous!
Turn Those Cheap DIY invites Into A Chic Semi-Handmade Invitation Suite
 Of course, being the craftinista that I am, I had to kick it up a notch. I mean I could just use the kit as it was meant to be.... Instead, I took my DIY invitation kit over to the paper crafting section of the craft store and found some nicely coordinating papers and ribbons. You could add a stamp, a wax seal, pressed flowers, or whatever floats your boat. My obsession is with paper!
I chose two coordinating papers to offset the colors on my do it yourself wedding invitations.
First I embellished my response cards by adding a layer of decorative paper onto the back for a pretty contrasting decorative border.
To do this I simply cut the paper into pieces measuring exactly 1/4" larger than the response cards. I flipped the response card over and applied some adhesive with a permanent glue runner. I then attached the card to the decorative paper, centered so the paper shows on all 4 edges.


Next I created a belly band to hold the invite and response card together.
I started by using my paper cutter to slice some 12x12 paper into 3" x 12" strips. I laid the printed invitation over the band and made small mark just where the band should fold to hold the invites and inserts together.


If you are using a lighter weight paper you can probably get away with simply folding the paper around the invitation.
But since I was using a pretty heavy paper (similar to the weight of cardstock) I decided to score the paper before I folded it.


Using the marks I created I held the paper onto the grid on my paper cutter and lined the marks up with a ruler. I used a bone folder against the ruler to score the paper.
After scoring I simply folded the paper and placed it around the invitation. I also laid in my response card and tied everything shut with a thick sheer ribbon.

I also created a matching envelope liner!
This was the tricky part but the results are fantastic!
To create the liner I first had to create a template / pattern of sorts. I laid the paper down bottom side up, and laid the envelope on top of the paper.
I used a pencil to trace the shape of the envelope. With my paper cutter I cut the basic shape out, and then rounded the corners with scissors. I had to go back and trim about 1/4" off of each side to make the liner a bit smaller, and to leave room and not cover the envelope glue.

I also scored where the liner should fold with the envelope flap, using the same manner as I did to make the belly bands.

To attach the line I simply applied some glue runner adhesive to the upper flap. I slip the bottom part of the liner into the envelope, lined up the folds, and pressed the flap in place.
The end results of this semi-handmade project are fantastic. For the bit of extra work involved it is completely worth it. And I still managed to keep it affordable and inexpensive!

Steals and Deals
I bought the do it yourself wedding invitations kits from A.C. Moore Crafts. They were regularly $29.99, but I bought them with a %50 off coupon and brought a friend to buy one for me - $30.00 for two 50 count kits with response cards and envelopes
Scrapbooking paper goes on sale regularly also. But it can be expensive. DO NOT buy this paper at full price! You will need a lot to do what I did to create these semi-handmade invites.
The breakdown? It takes 1 sheet to make two envelope liners. Six response cards can be made from one 12 by 12 sheet. 4 belly bands from one 12 by 12 sheet.
So you would need 109 sheets to create everything for 100 invitations. At full price that could amount to over $109 dollars. BUT wait until a sale AND a 20% off coupon? Thes papers often go on sale for %40 percent off or 4 for a dollar. You do the math! You'll save lot!
The Specifics
About the kit: The do it yourself wedding invitations kit I used in this tutorial is by Gartner Studios and is labeled "Blue". The kit comes with 50 invitations, response cards, and envelopes for both.
The Paper: The papers were both from DCWV Cotton Bloom Collection.
The ribbon: You could find ribbon like this in pretty much ANY arts and crafts store. It runs around $3-4 per roll. Use a coupon!
The glue: Uber important! I use permanent adhesive glue runner. It's my fave thing to keep in my supplies bin. Use it sparingly to get the most for your money. I like to use Xyron brand glue runner but it seems that some stores are not carrying it fully.
More Do It Yourself Wedding Invitations Ideas
Create a totally DIY invite using blank pocketfolds! There are a number of online shops that sell blank pocketfolds and cards. You can even make your own! Create your own do it yourself wedding invitations by inserting your own computer printed paper into a blank card or pocket. You can add you own embellishments such as ribbons, rubber stamping, stickers, and more.
Use an Invitation Template. Why not print your own do it yourself wedding invitations? Our templates come with everything to make a complete stationery set. Just print and trim! You can even dress them up or add them to a pocket or card!
Do It Yourself Invitations Homepage > Make Your Own Wedding Invitations > Do It Yourself Wedding Invitations Kits


Printable Invitations | Bridal Shower | Blog | Contact | Advertising Policy | Privacy Policy
By Chris Fleckenstein, Copyright © 2006-2013 Do-it-yourself-invitations.com