
|
|
||||||
DIY Wedding Invitations Ideas:
Pink and brown (or chocolate) is becoming an ever popular wedding color palette/theme idea. And why not? It's such a classic and beautiful color combination! And what girl doesn't savor the thought of any chance to incorporate chocolate into her wedding?!
|
|||||||
All of these ideas can be modified with different papers and materials to create the perfect do it yourself wedding invitation your your chocolate and pink wedding palette. I hope you enjoy! As always, we'd love to see your creations as well so feel free to stop on over to our invitation show and tell and show us your cardmaking skills.
Make Your Own Pink And Brown Wedding Invitations
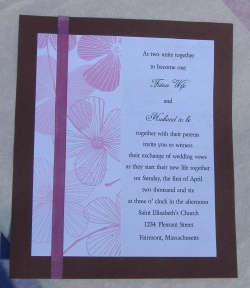 Materials and supplies:
- white and brown card stock
- decorative paper
- pink ribbon
- glue/adhesive
Step One: Start by cutting some 12 by 12 brown or pink cardstock into quarters to make 4 pieces of 6 by 6 invitation backing.
Step Two: Cut some white cardstock down to 5.5 by 5.5" squares. Use a word processor or similar program to print the invitation wording to the white cardstock.
Step Three: Mount the white cardstock onto the colored 6 by 6 cardstock invitation backing using some glue or adhesive, centering the paper as best as you can.
Step Four: Cut some decorative paper to match the pink and brown theme into rectangles measuring 5.5" by 1.5 - 2". Mount the decorative paper to the white cardstock at the far left edge of the paper.
Step Five: Glue on a ribbon facing vertically over the decorative paper. I like to use glue dots or a glue runner to hold into place.
Optional Step: You can leave the ribbon "as is" or glue on a pretty bow using the same ribbon, or even a nice paper or fabric flower accent.
Rustic Floral Pink And Brown Wedding Invitations
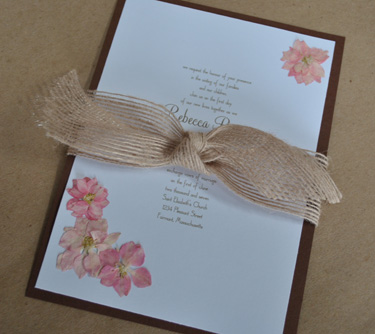 Materials and supplies:
- white and brown card stock
- pressed flowers or flower stickers
- rustic ribbon
- glue/adhesive
Step One: Cut some brown cardstock into 5 by 7" rectangles to create the backing for your invitations.
Step Two: Print the wording for your invitations onto some white cardstock or cotton linen paper and cut to 4.5" by 6.5" pieces. For an easy shortcut try using our free wedding invitation templates!
Step Three: Mount the white cardstock to the backing cardstock centering the two papers as best as possible.
Step Four: Arrange and attach some pretty pink pressed flowers, flower stickers, or even handmade paper flowers.
Step Five: Tie a rustic looking bow around the middle of your card. You can use the bow to tuck in an RSVP card and other wedding invitation suite items.
Unique, Fun And Funky, Pink And Brown Invitations With A Green Accent Color
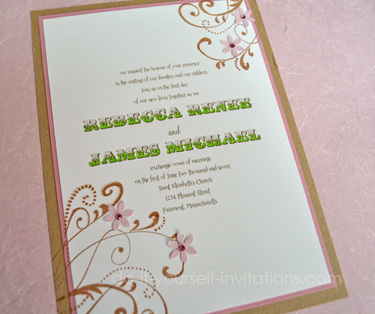 Materials and supplies:
- brown or kraft card stock
- pink, white cardstock
- flourish stamps and ink
- flower punch and rhinestones
- glue/adhesive
Step One: Cut some brown or kraft cardstock into 5 by 7" rectangles.
Step Two: Print the wording for your invitations onto some white cardstock or cotton linen paper and cut to 4.5" by 6.5" pieces. As I said above, feel free to use ourfree printable invitation templates to format and print the invitation wording.
Step Three: Mount the white wording cardstock to the brown/kraft cardstock.
Step Four: Use a flourish rubber stamp to stamp on a brown or pink florish decoration.
Step Five: Punch some flower shapes from some pink paper/cardstock/vellum and glue them in place arranged within the flourish decoration.
Step Six: Glue some colored rhinestones to the center of each flower.
Optional Step: Add an extra embellishment by adding color to the wording. I colored in the unique font I chose using a green colored marker!
You May Also Like...

|

|

|
See Also...
How to print onto blank invitations
Using blank cards to make your own invitations
The best glues and adhesives to use in cardmaking
Shop pink and brown wedding invitations templates
Do It Yourself Invitations Homepage > Make Your Own Wedding Invitations > Pink and Brown Wedding Invitations
The DIYI Ezine
Printables and templates
Printable Templates


Printable Invitations | Bridal Shower | Blog | Contact | Advertising Policy | Privacy Policy
By Chris Fleckenstein, Copyright © 2006-2013 Do-it-yourself-invitations.com