|
DIY Baby Photo Thank You Cards
DIY Scrapbook Photo Thank You's
Who doesn't love a good baby photo? These scrapbook baby photo thank you cards are sure to be a big hit.
These cute cards will be album worthy, and even perfect for popping into a picture frame! Your personal touch will speak volumes!
Baby photo thank you cards supplies:
Step One: Creating Cards
Start by creating a handmade folded card or printing onto a blank card. You can make quick and easy folded cards using one of our printable invitation templates.
Step Two: Decorative paper!
Choose a decorative paper to offset your baby photo. This can be any kind of paper. Wrapping paper, plain construction paper, scrapbooking paper; you could even choose to use fabric to add a little texture to the thank you cards.
I like to use scrapbooking background paper the best. It is relatively inexpensive (especially when you find the sales!) and it comes in a HUGE variety of different patterns and textures.
Cut the paper into squares. They can be as big or small as you want but your picture should fit inside of the square with a good bit of space around it. I cut mine sized at 3 1/2" by 3 1/2".
Step Three: Baby Photo's!
If you want to you can use actual photo prints for these thank you cards. I'm sure the recipients will be quite happy. But they will come out just as nice if you use a digital camera picture and print it onto plain white printer paper.
<>
Most digital cameras are accompanied by photo editing software. You can use this software to crop a photo close so you get only the area of the picture you want to see (as I have done in the photo in my card).
An excellent software to use for this sort of thing is Adobe Photoshop. You can download some software just like it for free on the web called Pain.net
Crop the photo and try to copy and paste it, or duplicate it, so that you can print it as many times as possible onto one page.
Next use a paper cutter to cut these baby pictures out.
Step Four: Paper punch embellishments!
I used two different sized heart shaped paper punches, but you can use any shape you want. I punched them out of two different colored papers.
There are oodles of different shaped punches available. Mix and match as you please!
Step Five: Assemble It!
For the final step use a good glue or adhesive to pull it all together. My favorite glues to use are an adhesive runner and some quick dry craft glue.
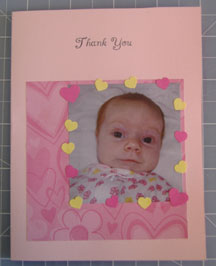
Start by attaching the decorative paper square centered towards the lower half of the card. Next attach the baby photo to the upper right hand corner of the decorative paper leaving a small margin of decorative paper around the outer edge.
Lastly, attach the paper punch shapes arranged facing in all directions overlapping the edges where the photo meets the decorative paper.
More Tips For Making DIY Baby Photo Thank You Cards
Try to match all of the thank you cards colors to the photo you attach to the front. For example, if you look closely at what the baby in my card is wearing, you will notice the colors of her sleeper match the colors on the card. This really makes the whole look and feel of the card.
Switch things up! Change it to a boy theme card by using blue cardstock and boy themed decorative paper. Instead of heart paper punches try using a frog shape or something else boy theme.
Go all out! Add some ribbon. Layer on a couple more decorative papers or stickers!
|