|
|
|||
Make Your Own Sweet Sixteen InvitationsI just love the origami party dresses I mounted on the front of the card. What sparked this idea was a handmade invitation submitted to us from Tina of Kitty Kat Kards. She makes these fabulous origami dresses (amongst other really cool origami creations) and affixes them to her card designs. The instructions to make them yourself are at Origami-club.com, but after a few tries I gave up and ordered some from Tina's shop. So much easier!
How I Made These Unique Sweet Sixteen Invitations Step One: Printing the invitation wording. I started by setting up the wording on my computer and centering it to print onto my A2 sized cards. Step One: Printing the invitation wording. I started by setting up the wording on my computer and centering it to print onto my A2 sized cards.
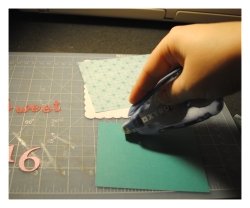
Step Two: Origami dresses. If you decided to make your origami dresses yourself, then you will need to pick out some paper to create the dresses from, as well as a matching or coordinated paper to use as part of the background on the invitations. Next, you'll spend some time folding up a bunch of origami dresses, and if you are anything like me, you might fail at it miserably and then order them from Tina. :-)
Step Four: Adding The "Sweet 16" to our sweet sixteen invitations. I actually cut out the letters with a die cut machine. The Cricut machine to be exact. But you are not limited by this. If you happen to have a die cut machine, by all means go for it. But if you do not, do not fret. You can easily by some chipboard letters, use a rubber stamp, or even some stickers. Before I had a cricut I actually printed lettering out facing backwards onto cardstock, and then cut them out with a craft knife or scissors. It took longer but it always looked really nice. Step Five: Adding Bling to the sweet sixteen invitations. To add one final touch I decided to add some small rhinestones to the edges. This IS someone's sweet sixteen invitations! Glam it up, right?! The secret? ONE of those rhinestones is glued to the top of a silver brad which will hold the whole thing together. To attach the brad to the upper left hand corner, either punch the brad right through the paper (that's kinda hard though) or punch a very small hole through all the layers of paper. Be careful to hold the papers in exactly teh right position when you punch the hole! Also, the smaller the hole the better, so that the papers do not shift and become unaligned. To finish, I just put the end of the brad through the hole and spread the little teeth at the backside to hold the brad tight to teh paper. Done! go from Sweet Sixteen Invitations back to Make Your Own Birthday Invitations page
|
The DIYI Ezine
Stay up to date with the newest tutorials, free printables and giveaways!
You Might Like...


|
|||
|
|
||||
|
| Homepage | Shop | Wedding Invitations | Birthday Invitations | Baby Shower Invitations | Printable Invitations | Bridal Shower | Blog | Contact | Advertising Policy | Privacy Policy
By Chris Fleckenstein, Copyright © 2006-2013 Do-it-yourself-invitations.com |
||||
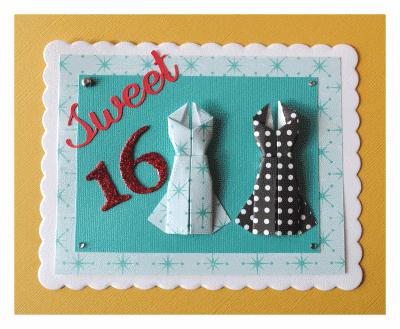
 Step Three: Layering papers. I layered two papers together and simply laid them on top of the scallop cards. The layered papers are actually attached to the scalloped card only by a small brad, so that all you have to do is slide the top layer out of the way and you can read the invitation. It will then just fall back into place.