
|
|
|||
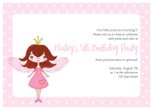
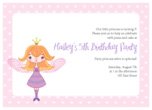
Make Your Own Princess Invitations |
||||
What little girl doesn't love a good princess party, let alone one that centers around Disney princesses?! These princess invitations combine the two!
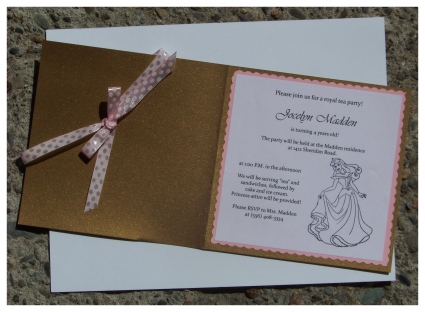
I managed to get my hands on these awesome Disney princess rubber stamps and set my mind to creating something posh and royal that would fit with a little girl's birthday party. What better than pale pink and gold?
These invites are easy to make and will make just about any lil' girl swoon. You can switch it up with different papers and colors, or even add color to the princess stamp. Add a lace ribbon, or velvet. Let you creativity go wild with royal princess inspiration!
The base of the card is made with a gold card stock purchased from LCI Paper Co.. I cut and then folded the gold cardstock to create cards. I paired the gold card stock with both a pink card stock and a plain 24 lb. paper.
Materials needed to make these princess invitations:
I started creating my princess invitations by setting up a template for printing the wording for the inside of the card. When setting up the text you will need to allow space for where you intend to place the princess stamped image. First I measure the stamp from top to bottom and left to right, and estimated how much space I need to leave open.
Then, when I went in to type the wording, I simply placed a white box of my estimated sizing onto the page and created the text to wrap around it. I also created a box around the text and set the opacity of the line at 10%, so that it would print very lightly to the page. Viola! Automatic cutting marks!
2. Cut your paper to the correct size.
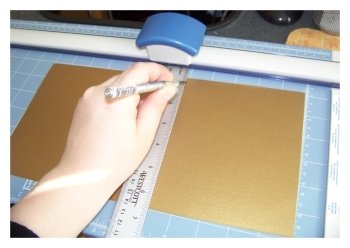
The next step is to cut all of your papers down to size. I chose to use 12" by 12" paper as all you have to do is cut it in half 12" by 6"), fold those pieces in half, and you've got a nice 6" x 6" card.
So, to create the 6 by 6 card... Cut the paper in half. If you are using a thick cardstock you will most certainly need to score the paper. This will ensure that you have a nice clean crease when folding the paper. Without scoring it will look like a mess for sure. No specific tool is needed to effectively score paper. Some paper cutters do have a scoring attachment, although I find that when in doubt, a ruler and anything with a blunt end will work. I have a tool in which I use called a bone folder. I love mine and use it A LOT, but you can certainly get away with using something else.
After Cutting and folding the base of the princess invitations it is high time to work on the inside of the invites! Here there are two more papers to cut - the decorative layer of pink paper, and then the white paper with the invitation wording printed on it.
If you are making just a handful or so of invitations and cannot hurt to cut them all by hand with a good quality paper cutter. But if you are having a party with a lot of guests you may want to consider having all of the paper cut for you. Most any print or copy shop has paper cutting services. They are fast and affordable. Paper is cut on a hydraulic machine that cuts an entire ream or more in one fell swoop! The last time I had paper cut for me it was done in under 10 minutes and I paid less than $10.00. You cannot beat that for the convenience.
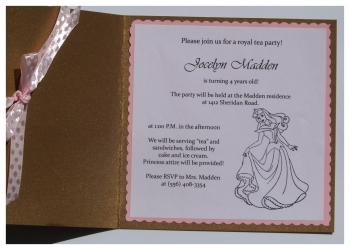 OK, on to the next step. Each of the next two papers will be cut at slightly different dimensions so that a little of the pink and gold paper will peak out from under the white. Since the gold cardstock at the base of the card will measure 6" x 6", I would recommend cutting the pink layer of cardstock at around 5 1/2" x 5 1/2", or even a little smaller. You can leave the pink paper as is and simply layer it onto the base of the princess invites. But I went a step further and gave this layer of paper a scalloped edge. I like the sweetness it adds to the card. I happen to own a Carl paper cutter, which has interchangeable blades. One of which had a scalloped edge. But you can also buy scalloped edge paper edgers (scissors) at most any craft store.
Cut the white paper with your invitation wording at about 5" by 5" or so.
3. Rubber stamp images!
Now to add the "princess" to these princess invitations. I always recommend using a good quality ink for stamping projects. There really is a big difference in a quality ink than the ink form the $1 bin at the craft store. I know it is tempting to purchase the cheap ink pads for sale in the dollar bins, but if you could compare the two, you would thank me for my advice.
When using clear stamps you will need a clear acrylic block to adhere the actual stamp to. Using clear stamps greatly reduces any errors and mess-ups since you can clearly see just exactly where your image will end up. I always keep some baby wipes handy for cleaning up the ink from myself and from the stamps. It is also good to have a good fine tipped marker in coordinating colors to your ink pads to use for touch ups.
Assemble it!
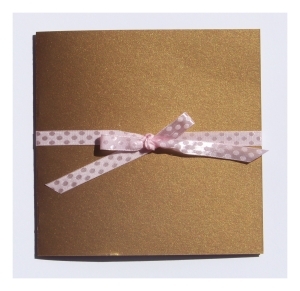
The last step? Assembly! You simply need to adhere the pink cardstock to the gold cardstock base, and then adhere the white cardstock to the pink. My absolute two favorite adhesives to use are double sided scrapbooking tape, and permanent adhesive glue runners. The glue runners are especially handy and keeps everything clean. No mess! Simply apply either of these adhesives to the back of each piece of paper, and carefully adhere it to the card surface centering the papers as best as you can. It may also work well to adhere the white paper with your wording to the pink cardstcok first, and then place them onto the card last. Once this step is completed all you must do is add a nice ribbon and bow!
Viola! Pretty princess invitations fit for your own royal little princess.
More tips for creating princess invitations:
I left the stamped princess image black and white for this particular invitation. You could go a step further in adding color! Why not try adding some color with some nice markers. If you a re a card maker through and through then you probably even have some Copic markers, which are very nice markers to use in inking artwork. You could even add some bling to these princess invitations by adding some glitter to her dress, or a little rhinestone to her crown. Or even some golden ink?
Do It Yourself Invitations Homepage > Make Your Own Birthday Invitations > Princess Party Invitations
You Might Like...


The DIYI Ezine
Printable Invitations | Bridal Shower | Blog | Contact | Advertising Policy | Privacy Policy
By Chris Fleckenstein, Copyright © 2006-2013 Do-it-yourself-invitations.com