
|
|
|||||||||||
|
Your DIY Guide To Make Wedding Invitations |
||||||||||||
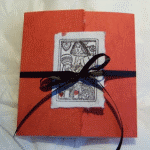
When you think of rubber stamping you might be picturing those big, thick, clunky wooden blocks with the little rubber image glued to the underside.
Wipe that image out of your head! Wood mounted rubber stamps are neat, and widely available, but a busy bride has little time to fool around with those type of stamps. Not that I don't still love them. And I DO use them presently if the image is one that is To Die For.
Why Clear Stamps?
Clear stamps allow you the ultimate in precision while stamping your images. There is no guess work! With a wood mounted stamp it is kind of aim and cross you fingers that it comes out as planned.Clear stamps, well... They're clear! You can see everything! You can see through to the paper you are stamping on. You can see if you've inked the image properly. You can see where you are aiming to stamp your image.
Clear rubber stamps are my "go to" for making wedding invitations that are frugal and fabulous. You simply cannot get much more affordable than what you can create with a single sheet of clear stamps! A set of clear stamps will run you from about $5.99 - $20.00. Even cheaper if you have a coupon.
Next it's time to think about inks! There is such a great selection of diferent colors and styles of inks out there to make wedding invitations! I always recommend using a reaaallly good quality ink. You'd thank me if you try to use the cheap stuff, trust me. Inks are about $5.00 and up. Add the price of paper, an acrylic stamping block, and maaayyybe some decorative paper.
 With Rubber Stamps you can make wedding invitations, and an entire stationery set. All matching, including pieces like table numbers and place cards, for a miniscule price compared to buying them from a commercial printer or invitation artist. If you want to acheive complete success quickly and easily in your quest to make wedding invitations then clear stamps are the way to go.
They may look kind of funny when you first see them on the shelf or when they arrive in your mail box. They never come with any directions!
When I first saw them I was like "how the heck do you work those little things??" The secret? You need to buy a couple of clear acrylic blocks to go with them.
Using Clear Stamps - A First Timer's Guide To Success
To start stamping images with clear stamps you'll want to get a few supplies together
- your set of clear stamps (cling stamps)
- an appropriately sized clear acrylic block
- good quality stamping ink
- stamp cleaner or baby wipes
The Block
It's important to choose an acrylic block that is an appropriate size for your stamps. You need them to fit onto the block of course! I tend to go for quite an oversized block. A super large block allows you to arange more than one stamp onto it at once. A great option! You may want to splurge for one really large block, and then get a small block out of the dollar bin for smaller stamps and projects.Another quality I really like for my acrylic block to possess is a grid. Many blocks have a grid etched in one side and the other is perfectly smooth for clinging the stamps. The grid is essential to perfect and straight alignment of your images. Especially if any of those images is text! Lay the block grid side down on the paper you plan to stamp onto, making sure the grid is lined up wit the edges of the paper. then start arranging your images how you want them on the paper. Remember, the images will display as a mirror image from how you arrange them onto the block!
The Stamps
OK, so those funny looking little flat clear stamps are actually kinda sticky on the back. They are designed to stick right to that clear block. No glue or anything.So you re-arrange all of the stamps onto a formation that is perfectly aligned for the design you wish to stamp and viola! The beauty of it is that everything is clear so you can see exactly where your image will end up on your paper. Unlike the old fashioned wooden blocks. This cuts your percentage of mistakes down to practically nill. I LOVE it!!
You can repeat the same image on all of your stationery, from invitation to RSVP's, programs, table cards, etc. And for all fo you gocco obsessed brides, you can make just one of each item and then burn it to a screen and gocco everything! You can even use them to make your Thank You cards!!
Make Wedding Invitations & Stationery
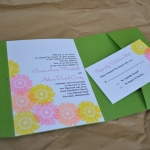
Making homemade wedding invitations is pretty easy-peasy when you get down to it. The hardest part is actually laying out the text to print onto heavy cardstock. Just to make it a tad bit easier on you all I have added some printable interactive PDF file wedding invitation templates to help you lay out the text for several wedding stationery pieces, from invitations, to rsvp's, to favor tags and place cards. I hope you all will find them useful! The templates allow you to easiloy lay out your text multiple times per single standard 8 1/2" by 11" sheet of paper. There are cutting guidelines to help cut the pieces to their most recommended sizes. Once you complete all of your printing, trimming, and whatnot, all you have to do is start stamping away!
Tips I recommend for using rubber stamps to make wedding invitations:
1. Do a test run! Always test out your stamps a couple of times before you get going on the real goods. You'll reduce mistakes with a little practice before you get started.
2. Keep baby wipes on hand. Baby wipes are perfect for cleaning your stamps and your hands, while working with all of those inks.
3. Add some color to text. When laying out the text for printing onto your wedding stationery, it really adds some interest to repeat matching or coordinating colors throught the text and stamped images!
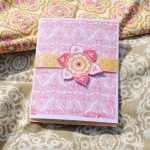
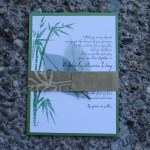
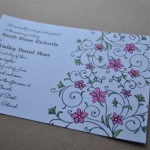
Rubber Stamp Wedding Invitation How-to's:
|
|
|

|
|
|
Well good luck and happy stamping! I'd love to see all of your hand stamped DIY invitations. Lend some inspiration by adding your very own page with tips, or a tutorial, or maybe just plain pictures to show off your invitations. Show off how you make wedding invitations at our DIY invitations gallery page.
Do It Yourself Invitations Homepage > Make Your Own Wedding Invitations > Rubber Stamp Wedding Invitations
The DIYI Ezine


Printable Invitations | Bridal Shower | Blog | Contact | Advertising Policy | Privacy Policy
By Chris Fleckenstein, Copyright © 2006-2013 Do-it-yourself-invitations.com