
|
|
|||
|
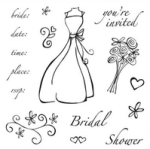
Handmade Bridal Shower Invitations |
||||
I paired a simple clear stamp set with some pretty handmade papers and ribbon to create a beautiful handmade bridal shower invite that any guest will be tickled to receive.

Handmade Bridal Shower Invitations Supply List:
- card stock
- colored paper or card stock
- plain white paper
- rubber stamp
- ink stamping pad
- paper edgers
- thin ribbon
- glue runner or adhesive
Creating A DIY Card
Start by cutting your cardstock to size. For this particular card I used a double sided mulberry card stock. My bride had a black and deep pink color theme for her wedding so this paper matched perfectly. It has a nice deep pink for the outside and the inside is a lighter pink. The paper also has a thread running through it so it appears to be handmade which gave it a touch of elegance.
I cut the card stock down to 7" by 6" and folded it in half to create cards measuring 3 1/2" wide by 6" tall.
Add Some Ribbon
Next I used a very small sized (1/8") round paper punch to punch a couple of small holes on the fold of the invitation. This is for threading through some black ribbon to tie on the edge of the handmade bridal shower invitations. Just another little touch of interest and elegance.
To make sure the ribbon would be centered I measured 1 3/4" from each end and made a small mark so I would know where to punch the holes.
I then threaded the ribbon through and tied it to a tight bow, trimming the edges at the end.
Decorative Paper Accents
Next I had both of my accent papers cut to size. For the light pink accent paper for the front I actually used the same mulberry card stock, just flipped it over to use the light pink side. You can use any colored paper or cardstock to match your invitation colors.
I first cut the paper to 4 1/2" by 3 1/8". By the way, I did not actually cut any of this paper myself. I commissioned the help of a local copy shop to do it for me. It is so much faster, easier, and precise than doing it myself. Especially when making hundreds!
After cutting the pink accent paper to size I then flipped it over and drew a straight line across the top and bottom using a ruler. The lines were drawn about an 1/8" down from either edge. I used this line as a guide while cutting with my paper edgers.
I used a pair of paper edgers that had a nice scalloped kind of pattern to them. It reminds me of lace, just like on a wedding gown!
Rubber Stamping
I cut the plain white paper next, to place on top of the pink accent paper. This paper I cut to 3" wide by 4" long. I used a white card stock, but a plain white paper of 24 lbs. or more should work fine too.
I peeled off the stamps I wanted to used and arranged them on my clear acrylic block. They stick by themselves so it is quite easy to use. I then simply stamped the images onto the white 4" by 3" paper, being carful to keep everything centered.
Afterwards I went back and colored parts of it in with a light pink colored pencil.
I also cut some white paper for the inside of the card which I went over with the paper edgers once again, but this time stamped the wording for the "who, what, when, where, etc..." onto the paper. This part is to be filled in later by the bride and family. You could also simply print the wording for the invitations and cut this out to place on the inside. Or even print straight onto the cardstock for the base of the card.
Assemble It!
The very last step I took was to assemble all of the pieces. I used a permanent adhesive glue runner to hold everything together.
First I glued the white paper for the front of the handmade bridal shower invitations onto the pink accent paper. I then placed this onto the front of the card. I was very careful to center everything perfectly.
Then I glued the wording to the inside of the invitation. Done!
Have you recently made your own invitations?
Want to share them with us?Just visit our Reader Submissions Page and tell us about your handy work!
Do It Yourself Invitations Homepage > DIY Bridal Shower Invitation Ideas > Handmade Bridal Shower Invitations
See also...
The DIYI Ezine


Printable Invitations | Bridal Shower | Blog | Contact | Advertising Policy | Privacy Policy
By Chris Fleckenstein, Copyright © 2006-2013 Do-it-yourself-invitations.com