|
DIY Halloween Party Invitations
Why not make your own Halloween party invitations? DIY invites are an excellent Halloween crafts activity!
Homemade Halloween Invitations are fun to make and they can add a fantastic handmade detail to your holiday party. And they don't have to cost you an arm and a leg. You can use the left over supplies to make cute decorations and favors, too!
 Materials and Supply List:
8" x 8" cardstock
coordinating decorative paper
rubber stamps
stamping and accent ink
pinking shears or paper edgers
craft knife
bone folder
ribbon
adhesive and glue runner
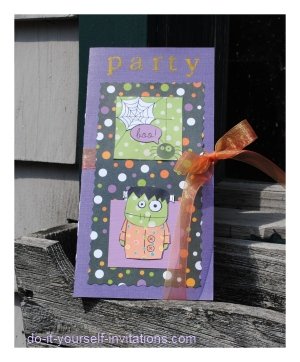
I had so much fun making these Halloween party invitations! They were made almost entirely out of a bunch of Halloween paper scraps I had laying around. The stamps I used were picked out of the dollar bin at the arts and crafts store. So all in all this was a very fun and affordable invitation to make.
Creating The Base of The Card/ Invitation
The very first step I took in creating the homemade invitations was to create an actual folded card out of some cardstock. I bought some textured, deep purple cardstock that was sized at 8" by 8" which is perfect for creating a sort of longish side fold invitation. To create the base of the invitation I simply used a bone folder and ruler to score and fold the card in half to create a 4" by 8" folded card.
 I started by marking the halfway point (4") at both the top and bottom of the paper. I then lined my ruler up along with these points and used my bone folder to score the paper straight down the middle. Scoring creates a perfectly clean indent in the paper for a flawless fold. I started by marking the halfway point (4") at both the top and bottom of the paper. I then lined my ruler up along with these points and used my bone folder to score the paper straight down the middle. Scoring creates a perfectly clean indent in the paper for a flawless fold.
After folding the card in half I then went over the fold on the outside of the invitation smoothing it out with the edge of the bone folder once more.
Creating Stamped Embellishments
Next I used my super bargain rubber stamps to create some cute embellishments for the front of the Halloween party invitations. The stamps I bought were clear stamps so I also had to bring my acrylic stamping block into play. I mounted the stamps one at a time and used plain old black ink to stamp the same images over and over again onto all of my different coordinating Halloween papers, including a bit of plain white cardstock I had scraps of lying around. The reason I stamped the images so many times all over these papers (there were 3 different patterned papers btw, as well as two cardstocks - 1 white and 1 light purple) was because my intention is to cut them up into smaller pieces and then mix and match the pices together to create an interesting little collage of color.
 SO, to give an example, what I did with the spiderweb stamp is stamp it three times. Once on plain white paper, once on a patterned paper, and then once more onto my light purple colored cardstock. I then used my craft knife to carefully cut the spiderweb from the white cardstock, and cut the "boo" word balloon form the colored cardstock. I used a precision tipped adhesive glue to attach the pieces I cut from the two cardstock papers onto the patterned paper, right on top of the stamped image. I repeated this same process to put together the little frankenstein stamp at the bottom of the card. It just adds so much more texture and interest! You could certainly do the same sort of card but with a little less hassle by maybe coloring it in with markers or something like that. I just like to take it a little bit further. SO, to give an example, what I did with the spiderweb stamp is stamp it three times. Once on plain white paper, once on a patterned paper, and then once more onto my light purple colored cardstock. I then used my craft knife to carefully cut the spiderweb from the white cardstock, and cut the "boo" word balloon form the colored cardstock. I used a precision tipped adhesive glue to attach the pieces I cut from the two cardstock papers onto the patterned paper, right on top of the stamped image. I repeated this same process to put together the little frankenstein stamp at the bottom of the card. It just adds so much more texture and interest! You could certainly do the same sort of card but with a little less hassle by maybe coloring it in with markers or something like that. I just like to take it a little bit further.
Piecing It All Together
 To pull everything together I added an orange organza ribbon I found on clearance at the craft store. I cut one longish piece and used a bit of glue runner adhesive to hold it onto the card. I only used a slight dad or two for both the front and back, only to hold it in place lying flat exactly in the middle of the invitation. To pull everything together I added an orange organza ribbon I found on clearance at the craft store. I cut one longish piece and used a bit of glue runner adhesive to hold it onto the card. I only used a slight dad or two for both the front and back, only to hold it in place lying flat exactly in the middle of the invitation.
Next I cut a piece of coordinating decorative paper for which I would use as a background for the embellishment I created. I cut two different pieces. One was for the main background. I cut it down to about 3 1/2" by 6 1/2". I then went back over it with pinking shears. You can use pinking shears or paper edgers with a zig zag pattern (or any other pattern that suits your fancy). I applied a healthy dose of glue runner glue to the back of the paper making sure to cover all four outer edges, and then placed it onto the front of the Halloween party invitations, centering it to the bottom half of the card (there should be more space left over at the top than bottom).
 The other piece of paper I cut was a small square of colored cardstock in which to place behind the Frankenstein image I created. I cut this square to about 2" x 2". I then used a combination of glue runner glue and quick dry adhesive to attach both embellishment pieces to the front of the invitations centering them both at top and bottom. The other piece of paper I cut was a small square of colored cardstock in which to place behind the Frankenstein image I created. I cut this square to about 2" x 2". I then used a combination of glue runner glue and quick dry adhesive to attach both embellishment pieces to the front of the invitations centering them both at top and bottom.
The Finishing Touches
To finish the Halloween party invitations, I started by adding the word "party" to the top of the card. I used a rubber stamp lettering set I had on hand, along with a bit of accent ink to punch it up, but the same effect could certainly be achieved (maybe even better) using a paper punch or even the Cricut if you have one. I also tied the ribbon into a bow and snipped the ends to clean it up a bit.
There is also the matter of adding your party invitation wording to the inside of the invitation. Because the paper was very dark in color I actually printed onto some plain white printer paper and then cut it down to sie (7 1/2" by 7 1/2") which I then folded and placed inside of the card attaching it with a bit of glue runner adhesive. I even used one of the stamps to add a small image to the inside of the invitation as well.
Do It Yourself Invitations Homepage > DIY Party Invitations > Halloween Invitations
|