|
|
|||
Make Christmas Party invitationsI have included a couple of different templates to help you along in creating super fast and easy invites. But these can easily be put together completely form scratch using a simple word processor, some graphics of your own or just a little crafty ingenuity. I have duplicated this invite by hand cutting construction paper to the shape of a Christmas tree. I've also adorned the front using a pine branch paper punch and paper in several shades of green. Get creative and you can really take this invitation idea in so many different directions.
Christmas party invitations supplies list:
Easy To Make Christmas Party InvitationsThe first page of the printable template is complete with Christmas tree graphics and colored text. All you have to do is choose some holiday inspired decorative paper to complete this homemade party invite!To create these invites start by printing page one of the template onto some heavy white cardstock. The template is designed so that you can also create folded cards from the page. To create a flat card style invite you will need to print the file onto regular paper, and then print again onto the back with the page facing the opposite direction. Cut the paper into quarters to create 4 flat cards per single sheet of paper. Choose a holiday decorative paper to use for the "gift" on the front of the invite. Trim the paper down to smaller sheets. I cut mine to 4.25" by 5.5". You will need to place the invitation wording and details onto this sheet of paper. There are several ways to go about this part of the process.
Glue the folded paper to the front of the Christmas party invitations. Do make sure that when you open the paper it will be facing in the right direction. Tie the ribbon so it holds the paper shut and ends with a ribbon on top of the "gift".
Create Homemade Crafty Christmas Party Invitations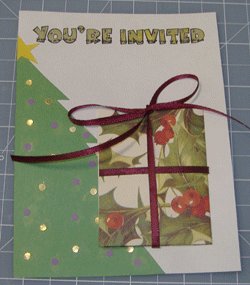 The second page of the template is created with plain simple "You're Invited" text across the top of each quarter of the page. This template is intended for a very hands on, crafty template.
To use this template you will add your own hand stamped or cut Christmastime tree or pine needle decorations. There really is so many different ways to decorate the background of the invitation. these also make a perfect kids Christmas crafts activity!
You can also color in the text across the front of the page for some added color and decoration. I chose a metallic gold pen to color the wording.
Optional finishing touches - add your own Christmas tree ornaments to complete these Christmas Party Invitations! Use paper punches and glittery paper or felt to create decorative accents to glue to the tree on the front of the invitation.
Do It Yourself Invitations Homepage > DIY Party Invitations > Christmas Party Invitations
|
You May Also Like
The DIYI Ezine
Stay up to date with the newest tutorials, free printables and giveaways!
|
|||
|
|
||||
|
| Homepage | Shop | Wedding Invitations | Birthday Invitations | Baby Shower Invitations | Printable Invitations | Bridal Shower | Blog | Contact | Advertising Policy | Privacy Policy
By Chris Fleckenstein, Copyright © 2006-2013 Do-it-yourself-invitations.com |
||||

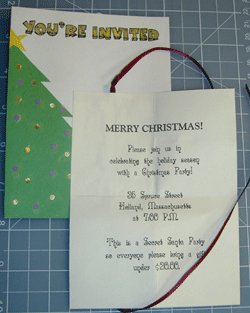 Using the same manner as I've outlined above, you will create a paper "gift" to attach to the front of the invite holding your party wording and details.