|
DIY Homemade Christening Invitations
 Baptism and Christening Invitations are one item that I get an awful lot of inquiries and requests for! So many people are looking for someting affordable and special for these milestones in their child's life. They're looking for something tasteful and personal! Baptism and Christening Invitations are one item that I get an awful lot of inquiries and requests for! So many people are looking for someting affordable and special for these milestones in their child's life. They're looking for something tasteful and personal!
What could be more personal than something you made with your own hands? And I want to share a couple tips and ideas, and my own special templates, for helping you make these homemade invitations with ease. And they won't break the bank either!
Materials and Supplies:
- 8 1/2" by 11" cardstock
- small paper doilies
- stick on rhinestones or pearls
- ribbon
- glue
How To Make Adorable Homemade Christening Invitations
With Little DIY Doily Christening Gowns!
So I gotta say, these really are cute! I had a lot of fun creating these tiny little gowns! The top is made out of plain white cardstock, and the bottom from folding a doily!
I created these handy templates for either cutting the gown tops by hand, or if you are a die cutting machine user I also have a jpg template to download to your design software. I use the Silhouette for my projects, so I also created a sillhouette file to share with you! :-)
To make the tiny christening gowns take a small doily (I used 4.5" doilies) and fold it in half. Now cut the doily in half. To get aproximately the shape I made fold the doily into thirds. You can make the fold a little less a-line with a straighter "skirt" for a more boyish look.
Next you'll want to cut out those teeny little bodice pieces. I used my die cutter but cutting by hand should wield good results as well!
Match the top to the bottom (doily) and glue it in place. I really, really like Scotch's quick dry glue. The stuff is AH-mazing! It dries super quick so your not held up waiting on drying time. And it has a great hold. LOVE the stuff!
Next glue a thin ribbon across where the bodice and skirt meet and glue it in the back to hold it in place. I use this super cute satin ribbon that you can buy in rolls from the craft store for around 50 cents to a dollar. And it comes in like a gazillion colors, so your bound to find one you like. I kept it simple and stateful with plain old white.
Now to add a lil' somethin', somethin'. I tied a teeny tiny bow with my pretty, satin ribbon (Can't have a christening invitation without a moderate amount of pretty satin bows, can I??). Using my super quick dry glue I affixed that baby right onto the front of the gown. I also added two tiny rhinestones. The results were precious, don't cha think?
So now comes the easy part...
Once you've put together your little paper christening gowns (I would enlist a team if I were making a whole lot of these. Would be so much more fun with firends!) you'll need to create the actual paper cards to create the christening invitations. And you're in luck because I created a printable template for this, too!
My template is interactive, and you can choose from blue, lavendar, or green, to make your invitations with. Using the christening invitations template is pretty easy. Open it with the latest version of Adobe Reader (pssst... it's free on the good ol' internet) and start typing away. Highlight the text and press the CONTROLL button and the letter E at the same time. This will bring up a tool palette in which you could use to change the font, text size, spacing, text color, etc...
Print the template onto plain white cardstock and trim it to size using the nifty cutting guidelines I included.
Now, you could use the card as is and affix the little christening gowns and "Viola!", you've got yourself a pretty cute homemade christening invitation there.
OR...
You could go a bit further and cut a piece of coordinating cardstock just a tad bigger than the card itself. I one-uped it even more and used textured metallic pearlescent cardstock in a coordinating color! Just too darn spiffy!
I gave both of my paper pieces some rounded corners using a paper punch. And then I went on and attached the printed card to the colored cardstock centering as best as I could.
Next I tied on a ribbon around one corner, criss crossing in the back (I even put a little piece of tape to hold it in place just to make things easier) and tying it around the other corner. You can tie a little bow here at the upper right corner. Or you could fudge it like me! Instead of actually tying the bow, I wrapped the ribbon around and glued it in place. Then I tied a little bow seperately and glued it on with my amazing Scotch glue. I trimmed the ends to a matching length, attached the little christening gown with some more glue, and I was done!
 Annndd if you're not all up to the big project of hand making all those little christening gowns, there's always the old stand by of just buying christening or baptism scrapbook embellishments from the local craft store and gluing them on. You can make a super easy, quick, and spiffy invitation by simply making a folded card and slapping on some stickers and embellishments and stuff. Annndd if you're not all up to the big project of hand making all those little christening gowns, there's always the old stand by of just buying christening or baptism scrapbook embellishments from the local craft store and gluing them on. You can make a super easy, quick, and spiffy invitation by simply making a folded card and slapping on some stickers and embellishments and stuff.
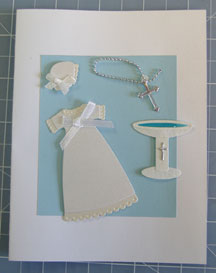
Like this card here that I made by simply using the folded card invitation template and adding a small piece of colored cardstock and some scrapbooking stickers. Cute! And super easy.
Do It Yourself Invitations Homepage > DIY Party Invitations > Christening Invitations
|