
|
|
|||||
Butterfly Wedding Invitations
So beautiful and whimsical, a butterfly wedding theme is becoming ever more popular. I just had to respond to the myriad of requests I've received from readers for butterfly wedding invitations ideas.
|
||||||
What could be a more easy or affordable DIY technique than to use a rubber stamp? Yes, I will admit that rubber stamps have become some what of an addiction. You'll see a lot of them on this site!
Using a well chosen rubber stamp set is hands down the cheapest way to get really creative and make an entire and almost branded set of wedding stationery suite. You can make everything from invites to table and place cards, thank you notes, favor tags, etc.

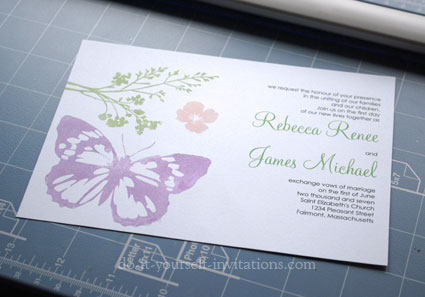
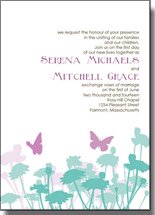
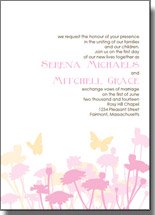
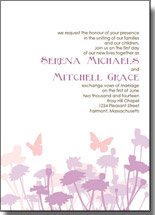
I created this particular butterfly invitation suite using a a few select stamps from a garden theme clear stamp set.
Butterfly Wedding Invitations Supply List:
- 8.5 by 11 inch cardstock
- butterfly rubber stamps
- colored stamping inks
(optional items)
- decorative papers or colored cardstock
- glue/adhesive
- ribbon or rafia
These butterfly wedding invitations are super easy to make! I started by printing the wording for the invitation using our free printable wedding invitation templates.
To use the templates simple open the file within your browser and highlight the text you would like to change. If the typing tool control bar does not automatically pop up then you will need to press CONTROL = "E" at the same time (Mac users press the apple or command key and "E").
To change the wording and names simply type away! Use the tool palette to change the fonts, font size and colors, alignment and spacing.
Print the template onto heavy white cardstock. I recommend printing even text at the highest quality settings for your computer printer when it comes to printing your own wedding invitations.
For this invitation I chose a clear stamp set from Inkadinkado called Garden Delight. I like to use a set when creating a full stationery suite as you can mix and match the stamps and create a central theme without re-creating the exact same image over and over. Each piece can be a subtle variation!
When using clear stamps you'll need a clear acrylic block in order to mount the stamps. The block allows you to mount them however you wish for them to appear.
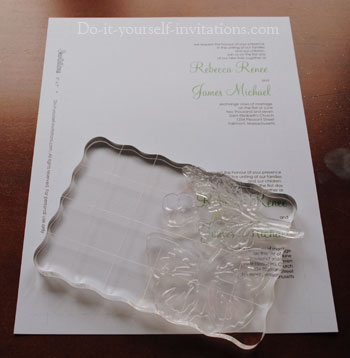
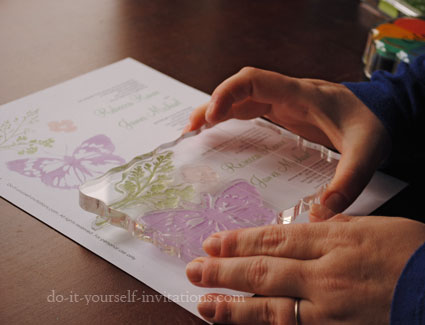
I chose the fern and butterfly stamps, as well as a small flower blossom stamp. I arranged them on the block so that they would all fit on one side of the invite with the fern sort of trailing off of the paper.
I wanted all of the stamps to each appear in a different color, so I used tear drop shaped stamping ink so that I could apply ink to each stamp image without touching the others.
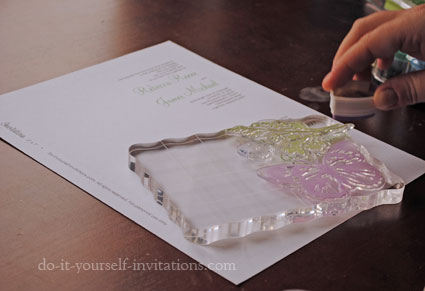
Once one sheet of invites was done I simply re-applied the ink and kept on stamping until all of the invitations were done.
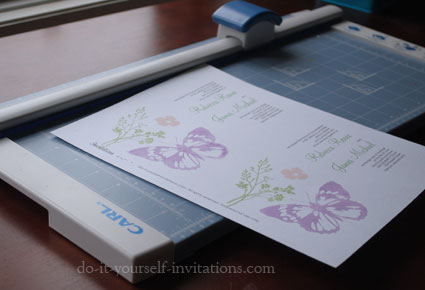
After stamping the colored butterfly and garden images I then went on and trimmed the invitations down to a 5 by 7 inch card. Our templates have some guidelines printed onto them that make it super easy to trim to size with no hassle. All you need is a good paper cutter!

After trimming the invitations they are actually fine to use "as-is", just trimmed and popped in an envelope. You could even choose to make matching DIY envelope liners or even stamp the images on the outside of the envelope as well.
OR...

You could go a step further and dress them up even more!
After trimming the invitations I cut another additional piece of paper with a decorative pattern to mount the invitation to. I love the added interest and texture this lends to an invite. It transforms into a very rich looking invitation!
Cut the decorative paper just a tad bigger than the invite (by maybe a quarter of an inch or so). Apply some adhesive to the back using a glue runner, double sided tape, or a good quality glue stick.
Attach the invite to the decorative backing centering the papers together as best as you can.
Creating Response Cards
I also created some matching response cards using another of the free invitation templates. There are free templates for everything form Save the Dates to place cards and more!
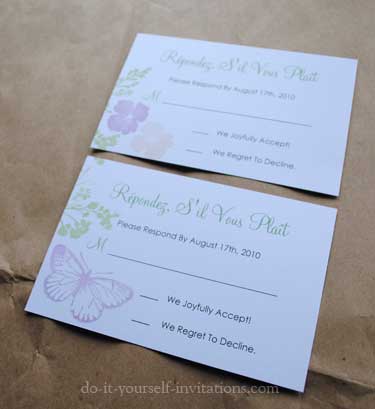
I started to experiment a bit and ended up making different rsvp's by utilizing all of the stamps in the set. I kept the same look and feel by incorporating all of the same colors with some of the same running images such as the fern.
Matching Belly Bands
I had some paper that matched with the colors I used on the invite so I used it to make a belly band to pull everything together and hold the different pieces together.

Belly bands are super easy to make! I simply cut the 12 by 12 inch paper into 2 inch strips.
I laid the paper face side down onto my work surface and laid the invite on top of it to estimate where I would need the paper to fold in order to envelope the invitations.
I made a pencil mark where I wanted the paper to fold, and then used a ruler and a bone folder to score the paper in teh correct spot.
I then simply folded the paper, wrapped it around the invitation pieces, and secured it in place with some adhesive.
I tied some raffia around the band as a last minute embellishment. Thick ribbon or lace would look nice as well.
More Ideas and Tips For DIY Butterfly Wedding Invitations
 Another super easy way to make your own homemade butterfly wedding invitations is to simply find yourself some good decorative paper with a butterfly pattern to it! My favorite paper to use for papercrafting projects (such as cardmaking) is to use scrapbook paper. Wrapping paper is a pretty good alternative as well, although not as elegant.
At full price these papers are not cheap. But play your cards right and keep track of sales and coupons and you can make out on some fantastic savings and deals!
At many of the big chain craft stores you will find weekly sales and printable coupons. The scrapbook paper goes on sale at least once a month! You can get it as cheap as 75% off!
Decorative Paper Butterfly Wedding Invitations Supplies:
- 8 1/2 by 11" card stock
- decorative paper
- ribbon
- glue stick or glue runner
Step One: Text layout. Simple! Use one of our free printable invitations templates to create a folded card.
Use the template to print the wording onto some cardstock. Cut the cardstock in half horizontally. Score and fold the cards in half. Viola! Cute folded cards with your wedding invitation wording printed into the inside!
Of course, you could also just print onto some blank cards of your choice as well.
Step Two: Adding Butterfly paper. Pick out a butterfly embellished decorative paper of your choice. Measure the front of your cards and cut the paper to the same exact dimensions.
Apply some glue to the back of the decorative paper. I like to use either permanent adhesive glue runner or some good glue stick glue.
Attach the paper to the front of the card. Tie a ribbon down the front of the card and secure with a very small bit of glue or adhesive.
Tie a pretty bow and you're done. This butterfly wedding invitation would also do well with some colorful envelopes or homemade envelope liners with a coordinating decorative paper.
Do It Yourself Invitations Homepage > Make Your Own Wedding Invitations > Butterfly Wedding Invitations
You May Also Like...

Printable Templates


The DIYI Ezine
Printable Invitations | Bridal Shower | Blog | Contact | Advertising Policy | Privacy Policy
By Chris Fleckenstein, Copyright © 2006-2013 Do-it-yourself-invitations.com