|
Beach Theme Wedding Invitations
Using Charms To Create Fabulous DIY Beach Invitations
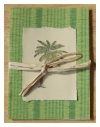
A great way to create truly elegant beach theme wedding invitations is to use charms. Layered paper invitations held together with charms is actually a pretty popular choice whether you're a DIY bride or not. But making them yourself opens possibilities to making your invitations completely one of a kind and unique!
When you make them yourself the invitation is completely personalized to you and your wedding colors and themes. And if you play your cards right and plan ahead you'll have chic, posh invites without the hefty price tag.
That's just what I did when I create these invites. I planned accordingly. To the sales that is! These charms went on sale for super cheap at a local craft store. Less than half price. You could try to buy them wholesale and still get a discount, but I chose the clearance sale route and saved a fortune. I bought every one they had on stock that had a beach theme, and put together these invites.
 Beach Theme Wedding Invitations Materials and Supplies:
- colored cardstock
- handmade silk fiber paper
- 100% cotton archival stationery
- cream colored ribbon
- beach theme charms
- glue runner or double side tape
To create these beach theme wedding invitations I simply layered three different papers together which are all held together with a bit of glue and some ribbon at the top. You can actually forgo the glue part to save money, but I liked it all a little bit more finished.
The first thing to think about is what size you want the invitations to be. I chose to go with a standard 5 by 7 inch invite. Therefore, the base of the invite (cardstock) is 5 by 7 inches. The handmade paper is 4.5 by 6.5 inches, and the top layer of paper in which I printed the wording is sized at 3 7/8 inch and 5.75 inches.
Getting the words on paper.
There are two easy ways to go about printing the wedding invitation wording. For one you could cut the papers ahead of time and then simply feed the paper at size through your printer and print each one at a time. To do this you would simply need to set up a Word document at the same size dimensions as your paper.
We also have a free printable wedding invitation template you could use to print the wording 2 to a page, side by side. All you need to do is trim the paper to size after you are done printing it. There are handy guidelines for cutting to 5 by 7. You would need to trim up the edges a bit further to get the correct size for this specific invite.
Cutting All Of Your Paper To Size.
As I have said above, you need to cut each layer of paper to a different size, going from the largest at the bottom to the smallest at the top. You can choose any size of invitation you want. Just make each piece slightly smaller than the last.
You can choose to cut all of the paper by hand yourself. You will certainly save yourself some money. But I prefer to bring my paper to have it cut for me. It's just so much easier and worth the added expense, which isn't that much.
Besides, if you have to go out and buy a good paper cutter for the project, it will probably cost about the same to have the papers cut for you. Maybe even less!
Call around to your local copy and print shops. They should be able to give you some quotes. They cut the paper on a huge hydraulic cutting machine which cuts entire stacks, reams of paper all in one fell swoop, with precision.
Layering The Papers Together
Place the papers one at a time on your work surface layering one over the other and centering them as best as possible. If you decide to stick them together with some double sided tape or some glue, you will glue them in place as centered and straight as you can get them.
Use a ribbon punch or a simple hole punch (I like the 1/8" punch) to punch two holes in the upper center of the card, spaced about 1/4" apart.
Thread a ribbon through the hole and slide a charm on so that it sits at the front of the card. Pull the other end of the ribbon from the front through the hole to the back. I actually tie a secure (but not too tight) knot at the back of the invitation at this point.
slide either opposite end of ribbon back through the holes. If you are using a thicker ribbon you can trim the edges at an angle and leave them as is. I used a very thin ribbon so I made a loop sort of like a ribbon, and slid the end of the ribbon back through the hole.
I actually used a very small amount of adhesive dabbed on the back of the ribbon to hold the "bow" in place. I secured the ends in the back with a large piece of clear tape.
Do It Yourself Invitations Homepage > Make Your Own Wedding Invitations > Beach Theme Wedding Invitations
|