|
|
|||
|
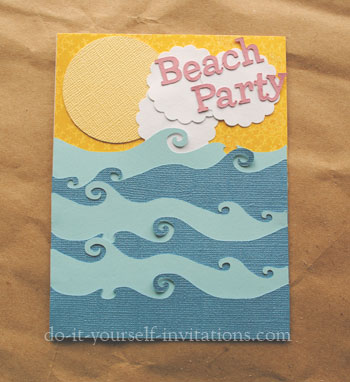
Make Your Own Beach Party InvitationsI made these beach theme invites using my Silhouette personal die cutting machine, but you could certainly make these by cutting by hand, or with a well chosen paper punch. I will also provide various templates for cutting out your waves pattern. For those of you use a die cutter, I will provide several templates for using with your Silhouette (or whichever die cutter you are using - hopefully one of these files will work for you!).
Beach Party Invitations Supplies List:
Blank Cards or DIY?I started this project by making my own DIY folded cards using ordinary white cardstock. I simply cut the paper in half and then folded it in half to create small folded cards of the perfect size. You could also simply buy a pack of blank folded cards. They are usually not too expensive and even come with envelopes as well. Pretty Pieces Of PaperOnce you've got your folded cards handy the next step to take is to create all of the different paper pieces you will need to piece together this unique invitation. 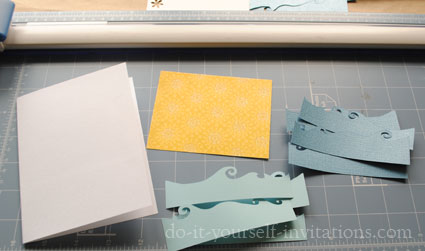 I started by created my "wave" die cut pieces. As I've said before, I used a die cutting machine, but you could certainly free hand cut some waves with a small, sharp pair of scissors. You'll need wave pieces cut from cardstock. You should have to different papers in different shades of blue. I even went as far as using two different textured cardstock papers. One of which is a textured, shimmery metallic paper. Wave templates for hand cutting and die cutters: You will also need to choose a decorative paper (or simply a yellow cardstock/color of your choice) to use as the background (sky?) for the beach party invitations. These should be cut into rectangles to fit the top of the card. You'll need some mellow yellow paper cut into circles for the sun (I used a large circular punch for this) as well as some scallop cloud like shapes of white cardstock for the clouds. I used a scallop punch to create the shapes but these could also be free-cut by hand. Lastly, you'll need some letters to spell out the "Beach Party" message on the front of the invite. I used my die cutter to create the letters from cardstock. You could but pre-cut letters, or even better - some letter stickers! Rubber stamp letters would work out fine as well. Creating Homemade InvitationsNow to put it all together! I chose to use some quick dry craft glue to pull this project together. You could also choose to use a glue runner, or glue stick. I started by attaching the yellow decorative paper to the top half of the card. I applied some adhesive to the back of the paper and simply popped it into place by aligning the edges at the top of the invite.  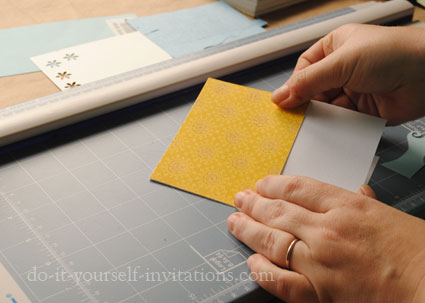 To get the waves attached in their rightful places I started by simply placing them (no glue) onto the paper starting from the bottom up. Once I knew where the proper place for the top most wave was, I glued that one into place. 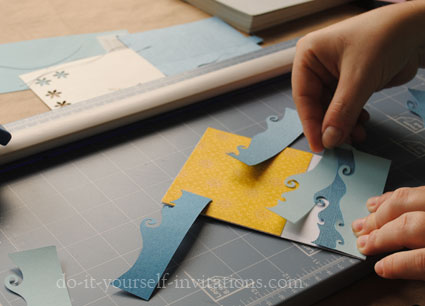 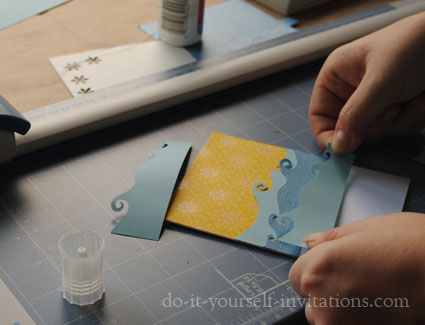 Starting from the top and working downward, I glued the different wave shapes into place, overlapping as I went. I tried to place opposite shapes next to each other and even turned some over so they were backwards. I glued the sun into place at the upper left hand corner of the card, as well as one of the cloud shapes which I slid slightly underneath teh waves.  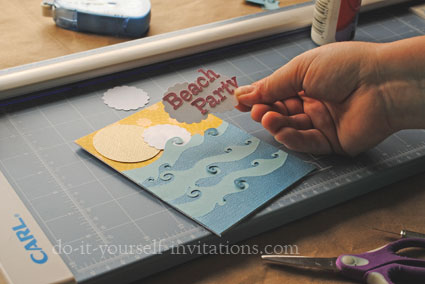 For the very last step I attached two of the cloud shapes together and then glued the lettering onto those. To finish the beach party invitations I simply glued this last piece into place and left everything to dry! 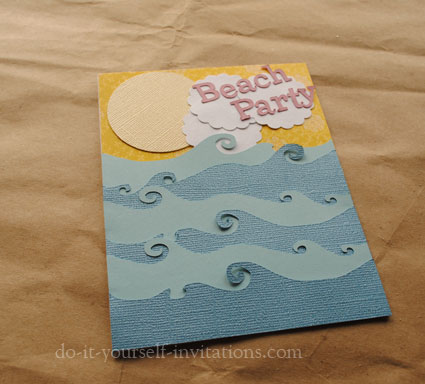 More tips and ideas for making beach party invitations...
|
The DIYI Ezine
Stay up to date with the newest tutorials, free printables and giveaways!
|
|||
|
|
||||
|
| Homepage | Shop | Wedding Invitations | Birthday Invitations | Baby Shower Invitations | Printable Invitations | Bridal Shower | Blog | Contact | Advertising Policy | Privacy Policy
By Chris Fleckenstein, Copyright © 2006-2013 Do-it-yourself-invitations.com |
||||