
|
|
|||
|
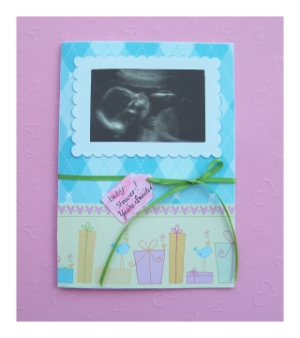
Unique Ultrasound Baby Shower InvitationsI used a ultrasound photo and some decorative paper to create these unique ultrasound baby shower invites. With a few paper crafting tools, some decorative paper, and a little creativity you can create some really cute baby shower invitations for that special mom-to-be's upcoming party!
For the base of this card I purchased some plain white blank cards. I used a rubber stamp I had on hand to punch the wording details into the inside of the invitation. The stamp has the "For:, Date:, Where:, etc.." wording and I just filled in the details by hand with a caligraphy pen.
First cut the background paper for the top half of the card. I actually cut mine to fit the entire front of the card. My cards were sized 5" by 7". The paper for the bottom half should match the width of the card you are using (5" in my case) by about 2" - 2 1/2" inches tall. I used a permanent glue runner to attch both pieces to the front of the card. To make the small tag piece for the front of the card I also used my Cricut to cut out the tag shape from some plain wite card stock. You could also use a paper punch, or go with a different shape like a heart or circle. Just punch a small hole into it with a 1/8" paper punch to thread the ribbon through. To add the baby shower wording you could use a rubber stamp, or do what I did and simply hand write it on with a nice caligraphy pen. Once the tags were finished I thread them onto the ribbon. To place the ribbons on the card I started by cutting many short lengths of ribbon for each invitation to make. I used a quick dry adhesive to attach the ribbon to the card front, only about halfway across the card so that the ribbon would fall just past the middle to the right of the invitation. I threaded the tags on and tied the ribbon into bows. To finish I trimmed the ends off of the bows so that they would hang equally. I trimmed the ends at an angle to give them a more finished look.
More tips and ideas for making ultrasound baby shower invitations * Instead of an ultrasound photo how aboout replacing that picture with one of the mother-to-be's baby belly?! * Use baby shower confetti on the front of the card instead of paper punch hearts to make these baby shower invitations.
|

The DIYI Ezine
Stay up to date with the newest tutorials, free printables and giveaways!
|
|||
|
|
||||
|
| Homepage | Shop | Wedding Invitations | Birthday Invitations | Baby Shower Invitations | Printable Invitations | Bridal Shower | Blog | Contact | Advertising Policy | Privacy Policy
By Chris Fleckenstein, Copyright © 2006-2013 Do-it-yourself-invitations.com |
||||
 Materials needed to make these unique ultrasound baby shower invitations:


