
|
|
|||||
Make Your Own Wedding InvitationsIf you are thinking about making your own wedding invitations, but a little unsure of yourself on the crafty side of things, this is the perfect tutorial for you! Layered paper invitations are easy to make and easy on your wallet too. With minimal supplies needed, and minimal steps to take in creating and assembling these DIY creations, you'll consider them a piece of cake!
|
||||||
The Low Down
Essentially what you will be doing is printing your wedding wording onto vellum, and then layering this on top of some pretty handmade or decorative paper and holding it all together by brad, ribbon, charms, or whatever floats your boat.What is so great about this easy DIY project is that you need no glue or adhesives of any kind!
You can match virtually ANY wedding theme or colors by picking your papers carefully. Matching a theme? Find a decorative paper, such as scrapbook paper with a printed design. You can get paper in most any theme from florals and damask, to all out theme wedding stuff like beaches, fairytale princess, etc...
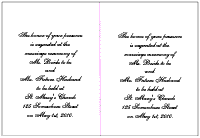
 Rose & Cream Invitations
I created this rose and cream wedding invitation idea to match a more traditional style wedding. The couple was having a church wedding, but an outdoor sort of garden reception. They wanted something simple and pretty and inexpensive to make.
These are so simple to create! AND you can find printed flower papers like this at pretty much any craft store. Check the scrapbooking aisle! This particular paper was printed with creamy off white roses, but I have seen it in red and pink roses. Not to mention the same with cala lilies and gerbera daisies!
What Kind Of Supplies Will I Need?
Luckily the supply list is short and sweet!
- cardstock (65lb., 90lb., 110lb.)
- handmade paper or decorative patterned paper
- printable vellum
- ribbon, cord, or brads
- paper cutter and hole punch
Let's Get Started!
The first thing you will want to do is take yourself a-shopping!This part is fun, right? Right! Take a drive down to your local craft shop, scrapbooking shop, or my least favorite but sometimes effective - office supply store.
Spend some time perusing the aisles for inspiration. My favorite is the scrapbooking aisle, but I am an absolute paper addict!
Try matching papers to cardstock colors, and ribbon as well. You'll also want to take a look for a good paper cutter and hole punch if you don't already own one.
I like an 1/8" hole punch, myself. But you can certainly go bigger if it suits you. There are even some punches that are specifically for punching slots for threading ribbon through. The two holes are perfectly spaced apart! A great option if this is you're only wedding craft project that may call for a hole punch.
Money Saving Tip - Always search for a printable coupon online before you go shopping. Print two or more and bring a friend along to help you purchase as much items on sale or with a coupon as possible.
Handmade Paper - If handmade is your paper of choice, then digging up a high quality yet affordable paper may be a bit of a challenge. But you've got options!
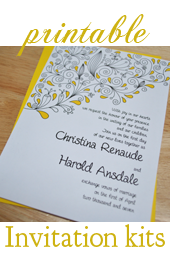
- Try a DIY wedding invitations kit! many of the DIY kits sold at the crafts stores and larger chains like Target, are simple cut handmade paper with a printable vellum overlay. In essence, it is exactly what I am featuring here!
- Shop online! If you are not lucky enough to have a shop like Paper Source (which has a A beautiful assortment of paper
by the way), you may have to search a little online for your handmade paper. I happen to really like Creative Papers Online which has an unbelievable selection with many clearance items, and they even have a paper cutting service! It's handmade paper heaven!
Printing Your Invitation Wording
Once you have shopped for, picked, and purchased you papers and supplies it is now time to get started on this creative process!
And where to start? The wording!
 You should have selected a vellum to print onto, or, if your patterned paper is light enough, like the rose and cream invitation above, you can print straight onto it.
The most efficient way to print onto your paper is to set up the text so that two invitations will print onto a single sheet of paper. You've got a couple of pretty simple options:
1. Use Microsoft Word or a similar program - or just use one of free 2-up wedding invitation templates - and print the invites two to a page. Cut the paper in half and then trim if necessary.
OR
2. You can cut all of your paper in half before you start printing and set up a Word (or similar) document to print onto a half page. Trim the paper after if necessary.
Cutting Your Paper To Size
The trick to make your own wedding invitations in this layered style is to cut each different layer to a smaller size than the last, so each layer peeks through a little bit. You can make them in two or three layers, depending on your style and budget.
Start by cutting the cardstock backing to the size you want the overall invitation to be. A good easy size is 8 1/2" by 5 1/2", which is simply have a standard sheet of paper. This size is easy because all you have to do is cut the base paper in half. BUT, do make sure and shop for envelopes first, so you know you can find the right color and size for your invites.
I tend to go with a 5 by 7 invitation, mainly because it is a very standard size for invitation and envelopes will be very easy to come by.
So to break down the steps:
1. Cut the cardstock to size (either half a page, 5 by 7, or whatever you want ti to be)
2. Cut a second layer to 1/2" smaller than the cardstock.
and if you are using 3 layers...
3. Cut the top layer a 1/2" smaller than the last.
Time and Hassle Saving Tip - Call around and check your local copy and print shops for paper cutting services. It is a freaking life-saver and a half! And cheap to boot.
Using a paper cutting service will cut your work load in half! And you will no longer have a use for a paper cutter. In fact, it is probably cheaper to have someone cut your paper than to buy a good paper trimmer!
Punch Holes and Assemble It
And for the last step you'll punch some holes into the top center of all the papers, and thread a ribbon or brad through to hold it all together.
Lay your papers on a work surface and layer each paper together so that everything is perfectly centered. I like to use a centering ruler to find the exact center and make a very faint mark to use as a guide point.
Very carefully pick up the papers and punch your holes where your pencil marks indicate - or if you're very brave, just eyeball it.
Thread a ribbon through the holes and tie it into a bow! You're all done!
Using Brads - If you choose to use a brad you only need to punch one hole. I recommend using a pretty small sized paper punch, as those brads tend to come pretty teeny tiny.
There is a great assortment of decorative brads out there, but you can just DIY it and glue your own decorative accents on as well.
Make YOur Own Wedding Invitations
Layered Handmade Paper Picture Tutorial
It can't get much cheaper than this where cheap wedding invitations are concerned.
I bought large sheets of handmade paper to cut down to size by hand. The sheets were on clearance for $1.00. Each sheet made 12 invitations!
I started by measuring a 5" strips down the entire paper. You can tear the paper for a rough kind of deckle edge for a more rustic invitation.
For a torn edge I recommend measuring 5" across and tearing the paper in long 5" wide strips.


After making the strips measure again at 7" down and tear the paper at each 7" interval until you have several sheets of 5" by 7" paper.
You can also do the same by cutting the paper by hand or having the paper cut for you by a service.

Next cut your printed vellum to size as well. The paper should be 1/2" smaller all around. So if the base paper is 5 by 7, then the vellum (or whichever you choose as you next layer) should be 4.5" by 6.5".

Lay the papers on your work surface centered together. Use a centering ruler to mark the exact center point and where your holes should be punched.

Thread your chosen ribbon or brad through the punched holes.

Tie the ribbon in a bow and you're done making your homemade wedding invitations!

Other Layered Invites
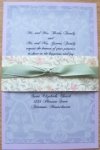 Make Your Own Wedding Invitations with a Lavender Damask Print
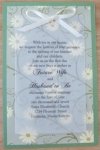
DIY Layered Paper Daisy Invitations
Do It Yourself Invitations Homepage > Make Your Own Wedding Invitations > DIY Layered Paper Wedding Invitations
The DIYI Ezine


Printable Invitations | Bridal Shower | Blog | Contact | Advertising Policy | Privacy Policy
By Chris Fleckenstein, Copyright © 2006-2013 Do-it-yourself-invitations.com