|
50th Birthday Invitation
50th Birthday Invitation Ideas and How to Make Your Own Invitations
Let's face it - a 50th birthday invitation is not always something easy to come by. There is not a whole lot of them for sale at your local party supply. You can find them online, but chances are the the selection will be limited. If you make your own initations you'll end up with an invitation that matches your party theme (or the lucky guest of honor's personality) perfectly AND it will be extra special because you made it!
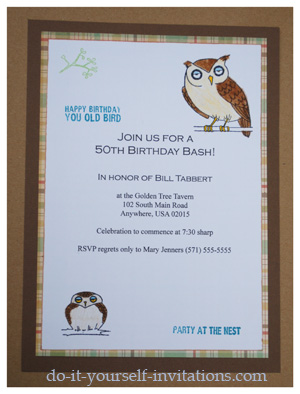
 I created this 50th birthday invitation for a friend of mine who was throwing a party for her husband. I used some rubber stamps to create these invitations. The rubber stamp collection had a whole assortment of grumpy looking birds, with some bird related quote. The first one I noticed was "Happy Birthday, you old bird" and I knew these were the perfect stamps for this invitation! I created this 50th birthday invitation for a friend of mine who was throwing a party for her husband. I used some rubber stamps to create these invitations. The rubber stamp collection had a whole assortment of grumpy looking birds, with some bird related quote. The first one I noticed was "Happy Birthday, you old bird" and I knew these were the perfect stamps for this invitation!
Materials used to make these birthday invitations:
cardstock
decorative paper
Inkadinkado Bird assortment stamps #97729
black and blue stamping ink
markers
brown flock
glue pen
adhesive runner
To make these birthday invitations I layered 3 different papers together. I used a brown textured cardstock for the backing of the card. I then layered a piece of decorative paper over the cardstock backing, and placed another layer of cardstock (the one in which I printed the invitation wording and stamped images onto) onto the very front of the invitation.
Start by cutting a piece of 8 1/2"{ by 11" cardstock down to a smaller size. 5" by 7" is a very standard size. Using a more standard size will make things easier when it comes to finding envelopes for your diy invitations. But overall, you can choose to make this 50th birthday invitation any size you like. To trim the paper to size, I start by cutting the paper in half, and then trimming the edges to bring the paper to the desired size. A really easy way to get your paper resized is to simply bring the entire stack of cardstock to a local print or copy shop where they will cut it for you with a huge hydraulic cutting machine. These paper cutters will cut an entire ream of paper in one slice! Which means all of your paper will be cut to size in minutes, and it is very affordable to boot. A very worthwhile option!
Cut the decorative paper a little smaller than the next. I would recommend by maybe 1/4" or so, depending on how you want the invitation to look. The decorative paper is meant to simply peak out form behind the top layer of paper, to lend some texture and style.
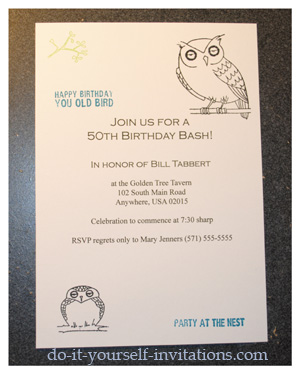
 The top layer is the most tricky as you will need to print your invitation wording onto it, as well as stamp the images from your rubber stamp onto it. Using a simple word processing program you can set a regular 8 1/2" by 11" document to print in two colums. By doing it this way, when you print the page all you will nee to do, is, again, cut the sheet in half and then trim the edges. Another great option is to create a text box with a border, sized at the exact dimensions that you want to cut your top layer of paper. Type your wording into the box (leaving room for some stamped decoration of course), print it out onto some white cardstock or high quality white paper, and then use the borders of teh text box as cutting guidelines. Viola! The top layer is the most tricky as you will need to print your invitation wording onto it, as well as stamp the images from your rubber stamp onto it. Using a simple word processing program you can set a regular 8 1/2" by 11" document to print in two colums. By doing it this way, when you print the page all you will nee to do, is, again, cut the sheet in half and then trim the edges. Another great option is to create a text box with a border, sized at the exact dimensions that you want to cut your top layer of paper. Type your wording into the box (leaving room for some stamped decoration of course), print it out onto some white cardstock or high quality white paper, and then use the borders of teh text box as cutting guidelines. Viola!
Stamp your images onto the top layer of cardstock, and then adhere all three layers of paper together. I like to use a good permanent adhesive glue runner to do this. Center each paper over the next as best you can.
Then for the final touches! There arte several ways for you to add some pizzazz to this handmade 50th birthday invitation, but here is what I did. First I used some markers I had on hand to add some color to the plain black and white stamped images (I stamped the bird images in black ink, and the bird quotes in blue ink). I used a glue pen to add ink where the feathers on the owls wings, tail, ears and head, would be. I then sprinkled some brown flock all over the glue. I waited for the glue to dry and then shook the excess off into the trash. Flock is a kind of powder that is designed to give a soft furry look to paper and more importantly, the images on your paper. So the owls on my invitations look like they have downy furry feathers. I love the texture it adds to the card. A very cute detail!
More 50th Birthday Invitation Ideas...
For added texture try stamping the images onto a separate paper and the cutting them out and gluing them askew onto the front of the invitations.
Instead of flocking stamp the images onto some patterned paper. Cut out only the wings, tail feathers, and the top of the head and glew it over the stamped images on the invitation, for a very crafty look.
Need more theme or invitation ideas?
A time line birthday invitation... include a line of pictures from different times in the person's life, showing how much they changed. This could be done in a very humorous or very flattering way.
For a silly and jesting kind of theme or invitation, do a "one year older and one year closer to the grave" party. Use themes like coffins and RIP. You can find plenty of stamps and paper with Halloween themes that will go perfectly with this sort of theme. In the off season they will even be on sale!
|

 I created this 50th birthday invitation for a friend of mine who was throwing a party for her husband. I used some rubber stamps to create these invitations. The rubber stamp collection had a whole assortment of grumpy looking birds, with some bird related quote. The first one I noticed was "Happy Birthday, you old bird" and I knew these were the perfect stamps for this invitation!
 The top layer is the most tricky as you will need to print your invitation wording onto it, as well as stamp the images from your rubber stamp onto it. Using a simple word processing program you can set a regular 8 1/2" by 11" document to print in two colums. By doing it this way, when you print the page all you will nee to do, is, again, cut the sheet in half and then trim the edges. Another great option is to create a text box with a border, sized at the exact dimensions that you want to cut your top layer of paper. Type your wording into the box (leaving room for some stamped decoration of course), print it out onto some white cardstock or high quality white paper, and then use the borders of teh text box as cutting guidelines. Viola!


